Still resorting to flat JPEGs in presentations? It’s time to elevate. This guide walks you through how to make use of Blender to create world-class 3D product renders and 3d models, with up-to-date 3d rendering methods, and integrate them in PowerPoint like a rockstar. From preparation of the model to camera animation and final embedding, learn to create photorealistic renderings that are better at driving engagement, clarity, and brand storytelling.
Your product can’t be flat, so why is your slide?
Static slides are the fastest way to lose concentration in a boardroom. You might have a top-of-the-line product but if your graphics are not quite so good, you're self-sabotaging from the offset. That all goes with the age of 3D rendering, animation, and Custom 3D Animation that allows you to articulate your product in various ways. If you're running your presentation with JPEGs and mockups, it's in need of an upgrade.
This tutorial shows you, step-by-step, how to import 3D product renderings inside your slides with Blender and PowerPoint, with accuracy in technical detail and freedom in design.
What You'll Learn in This Blog
What 3D product rendering is and why it's effective
An entire technical workflow using Blender
Exporting as stills or animations
Incorporating into PowerPoint professionally
3D rendering programs and instruments Design of products
How INK PPT facilitates the process for brands
Why 3D Rendering? The Technical Edge in Presentations
Modern-day consumers don’t just want to see your product but feel it. According to research, 3D visualizations and renderings of products will assist in increasing viewer engagement upwards of 40% and increasing conversions 30 to 50%. To presenters in the age of commerce, this means that you will be able to engage your customers more effectively:
Higher attention hold
Enhanced product transparency
Streamlined decision-making for stakeholders
With advanced 3D rendering software like Blender, you are able to develop high quality pictures, photorealistic visuals, and photorealistic animations that are far superior to traditional photographs. From developing product renderings of virtual stores, ecommerce businesses, and marketing brochures, the final output will be a photorealistic picture developed with custom 3D animation, real-time rendering, and technical accuracy, that comes remarkably near to reality. With effortless embedding in PowerPoint, your rendered picture now incorporates texture, lighting, and the surface of the model, by giving your viewer a comprehensive visual output.
Adding 3D Product Renders Using Blender
Here's a technically rigorous, step-by-step workflow specifically for designers and engineers to help elevate their presentation design skills.
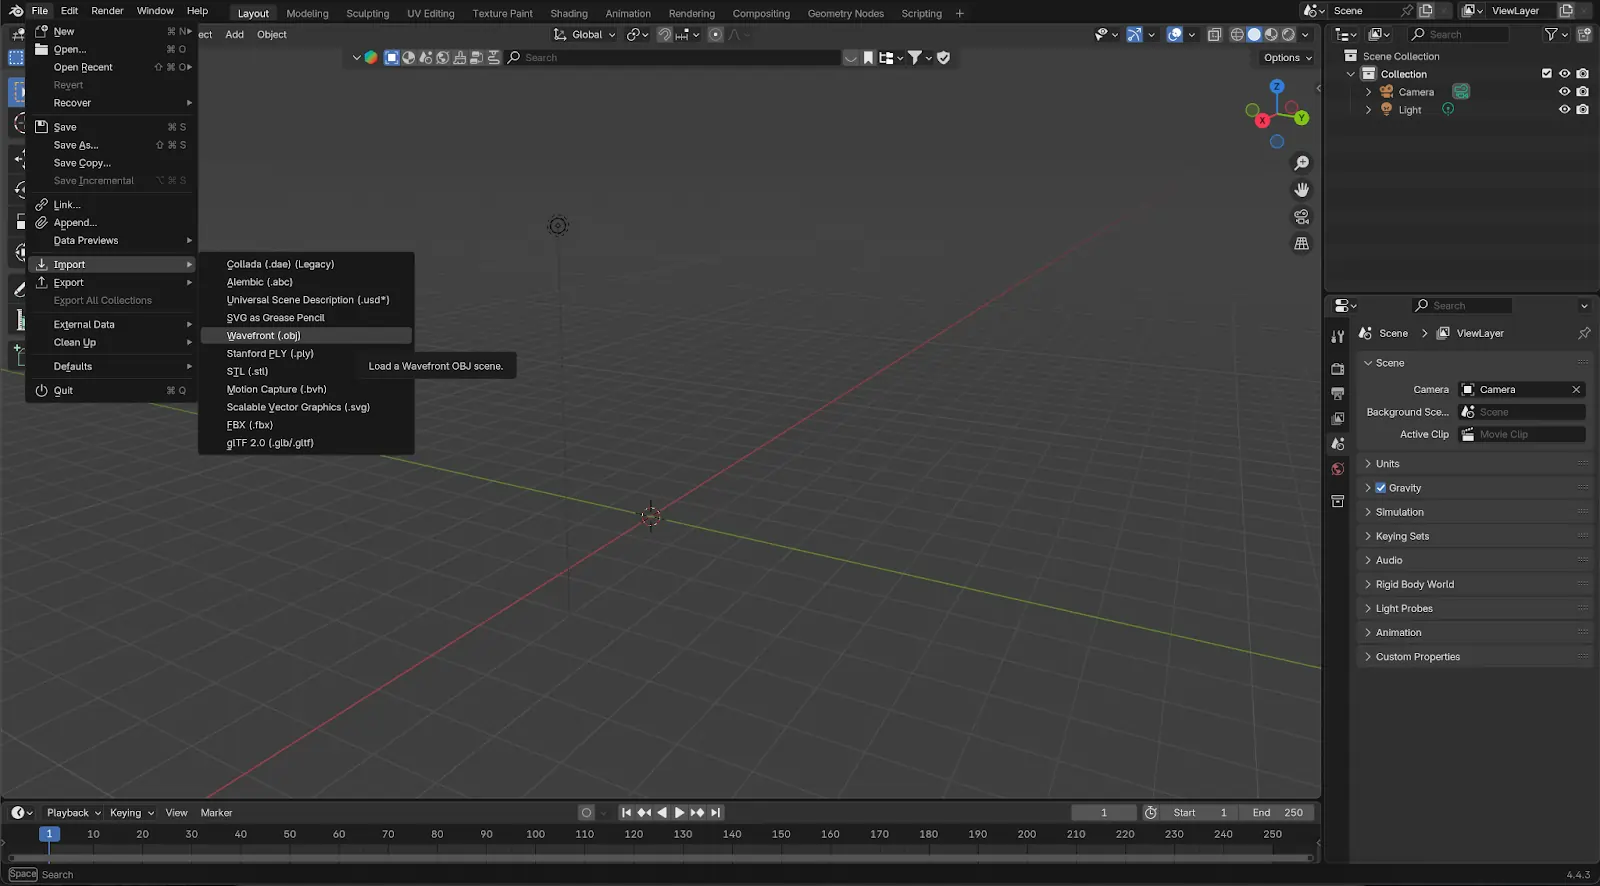
Step 1: Preparing 3D Assets for Blender
Input formats: It takes in .STL, .OBJ, .FBX, and .STEP files (via CAD export).
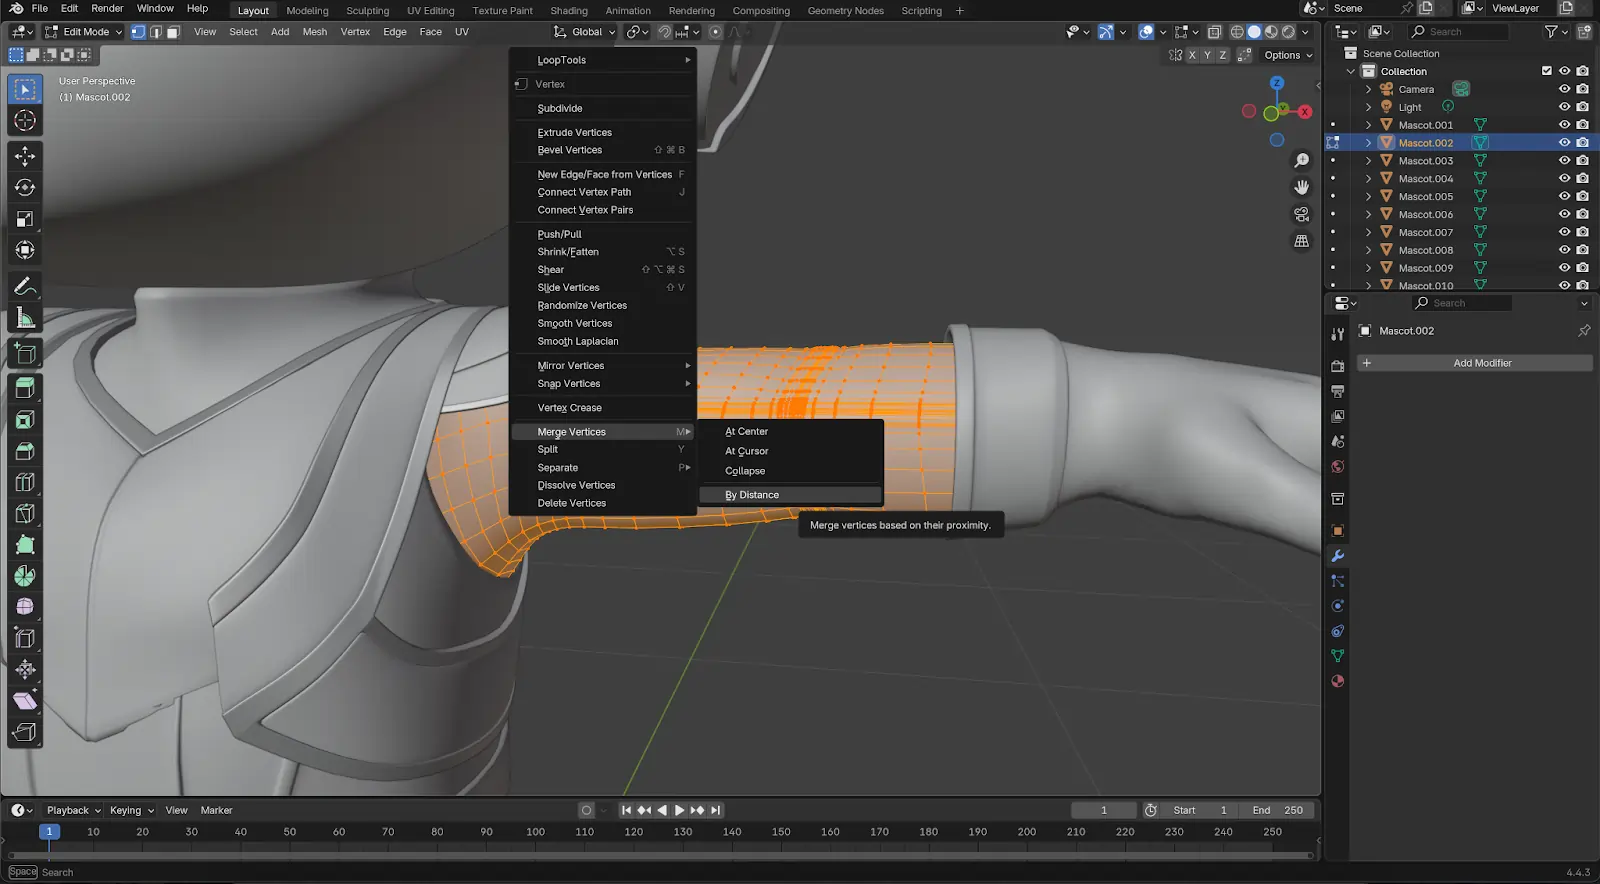
Geometry cleanup: Remove duplicate vertices with Blender’s “Merge by Distance”.
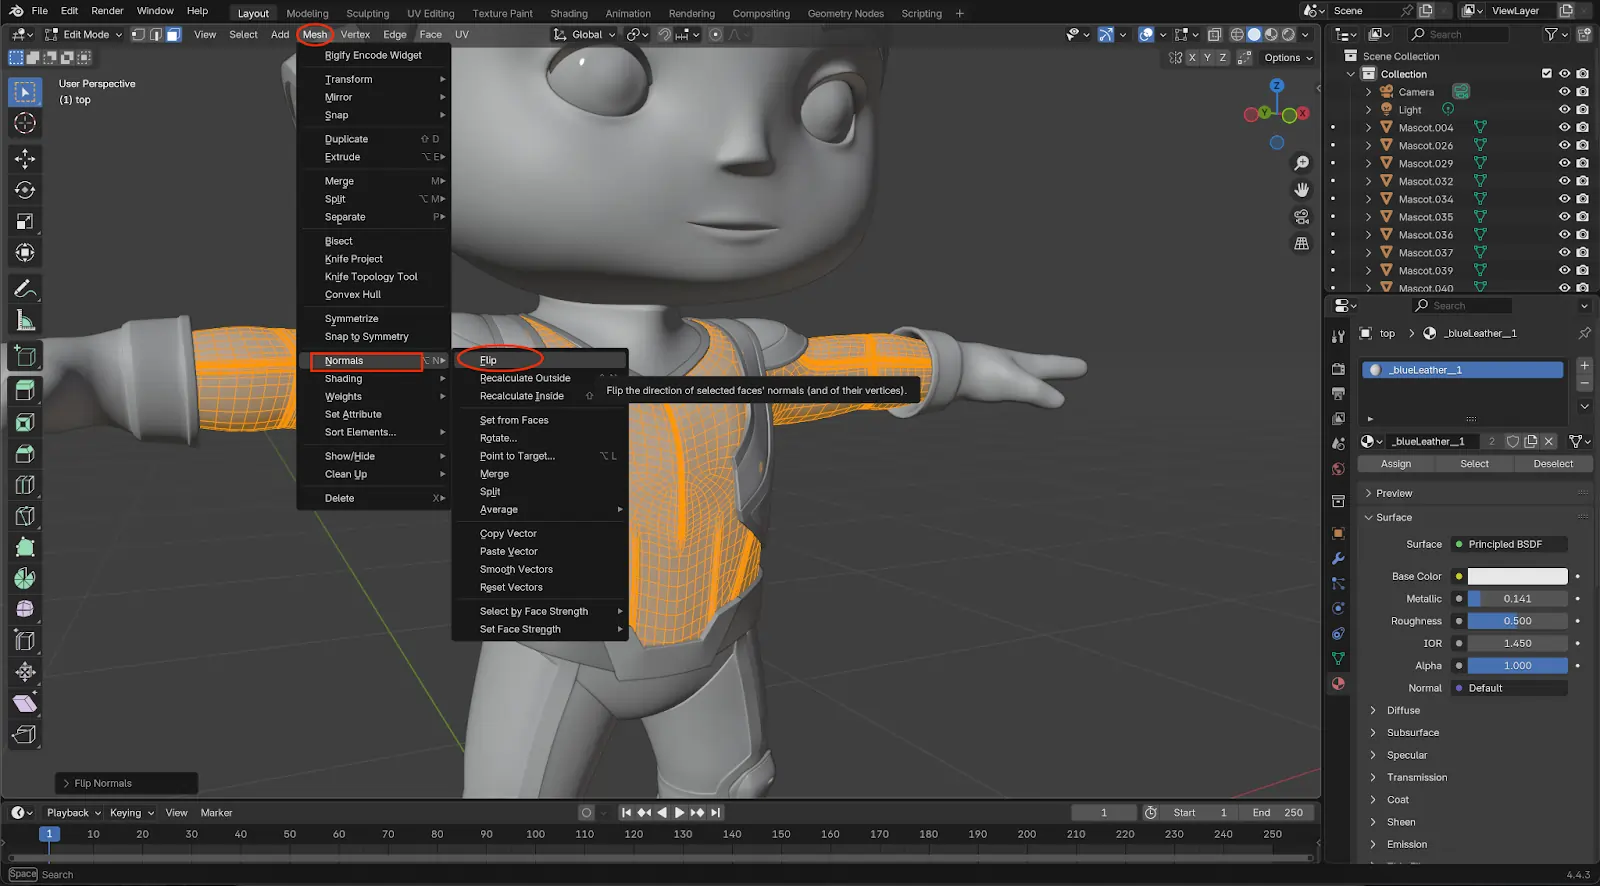
Normals: Ensure normals are uniform (Alt+N → Recalculate Outside) to avoid rendering artifacts.
Use scale: Ctrl+A → Scale to make objects act consistently during transformation.
TIP: Finish all of the modifier stacks in the Blender (Subdivision, Solidify) prior to rendering/exporting.
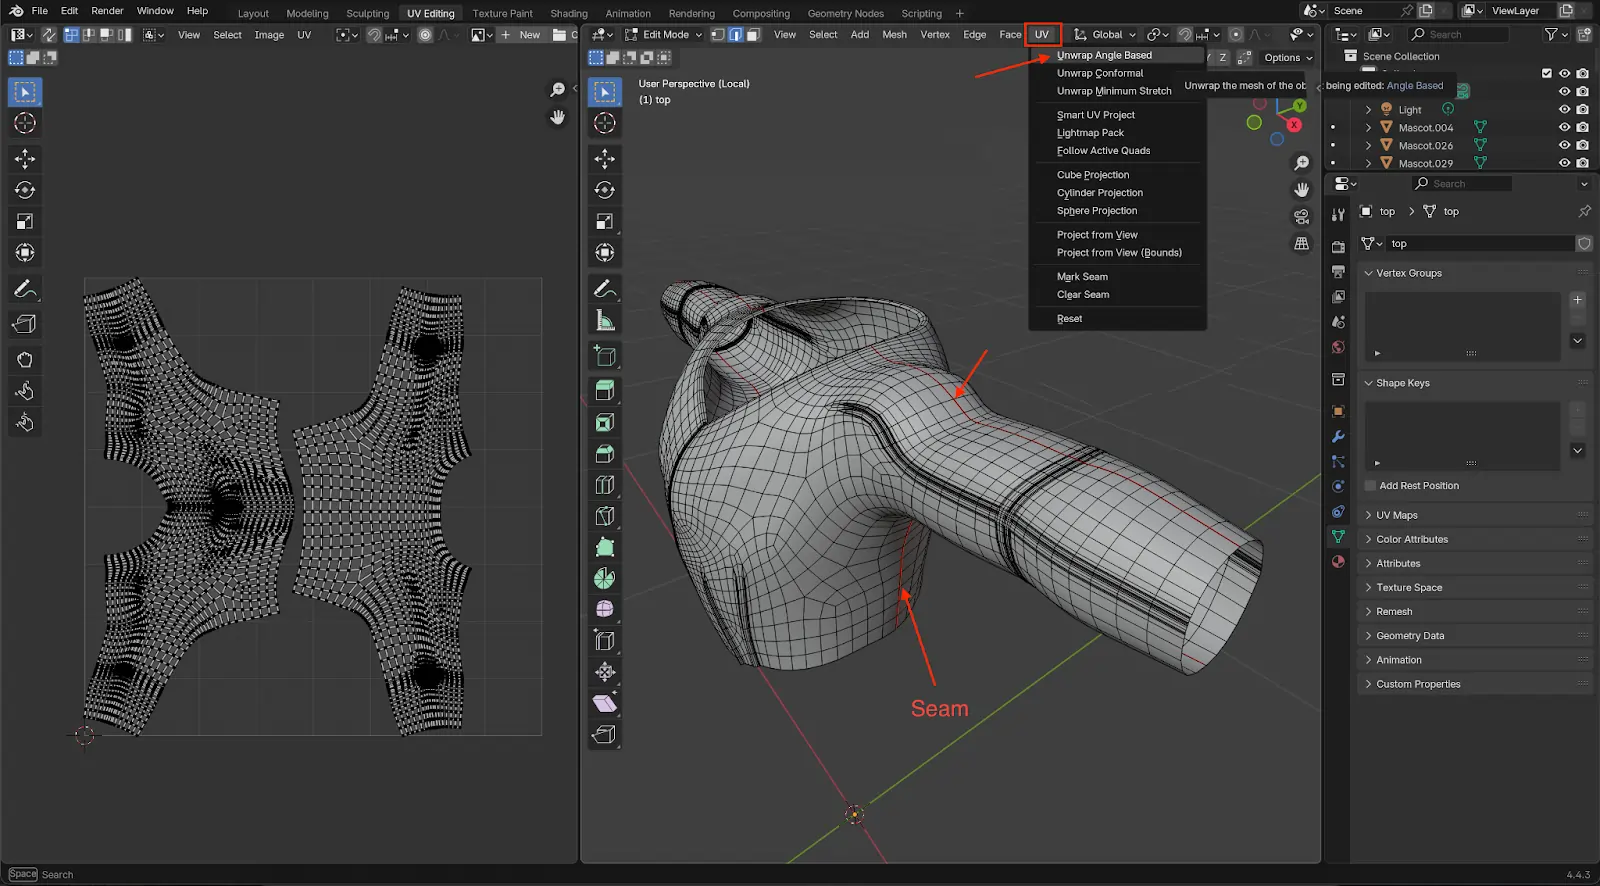
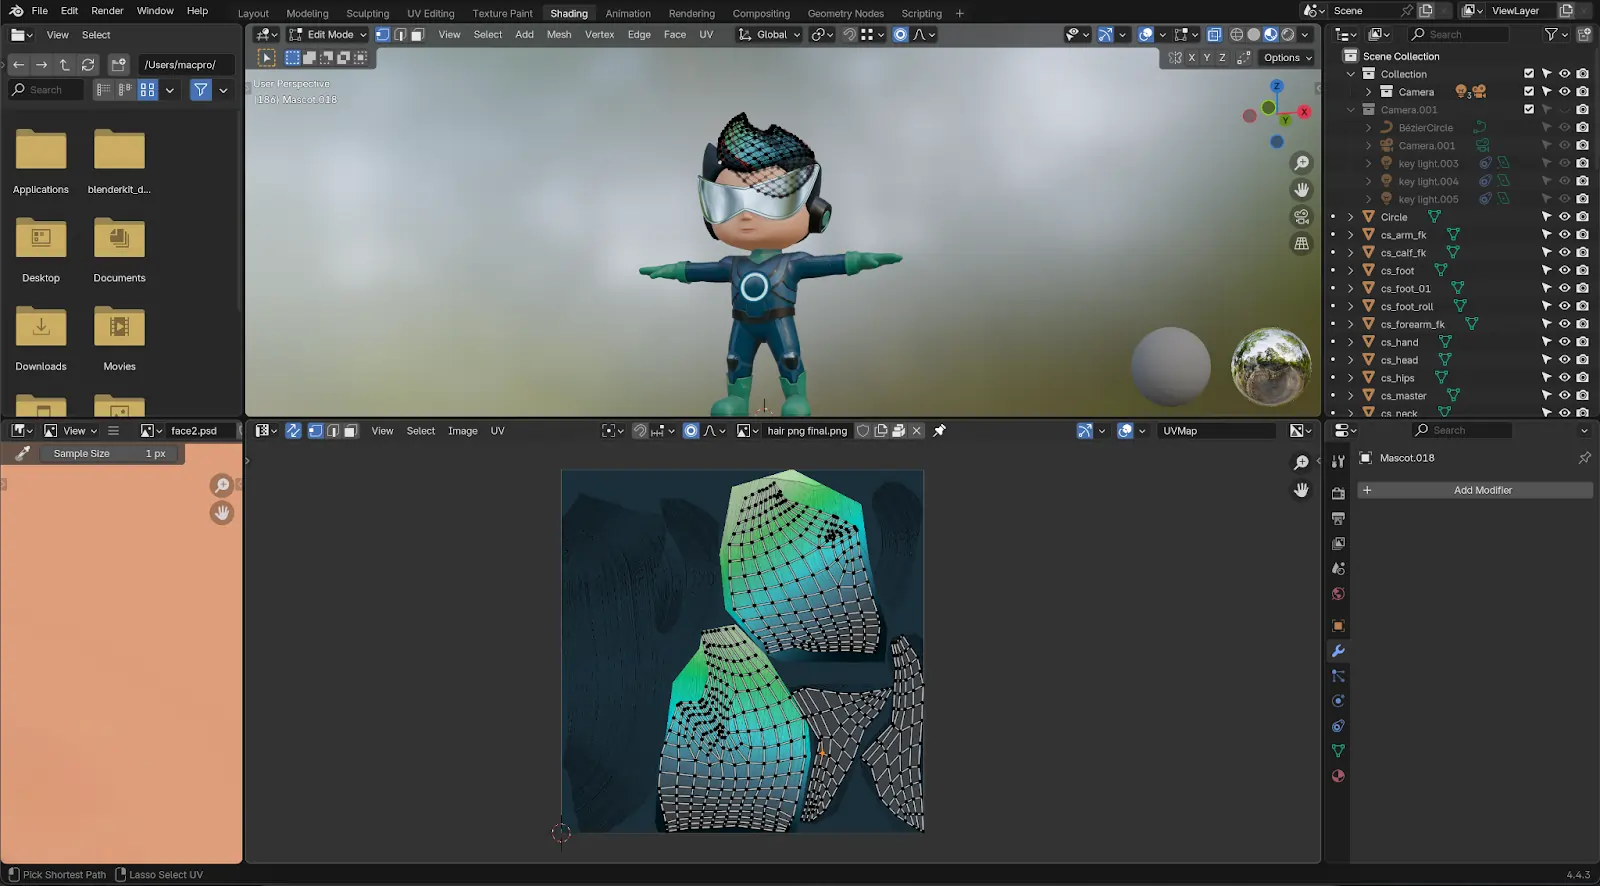
Step 2: UV Unwrapping and Texturing
UV Unwrapping: Use the Smart UV Project in Blender or set seams manually for complex models.
Texture mapping: Use PBR maps (Albedo, Normal, Roughness, AO). These textures can be obtained from sources like AmbientCG or Poly Haven.
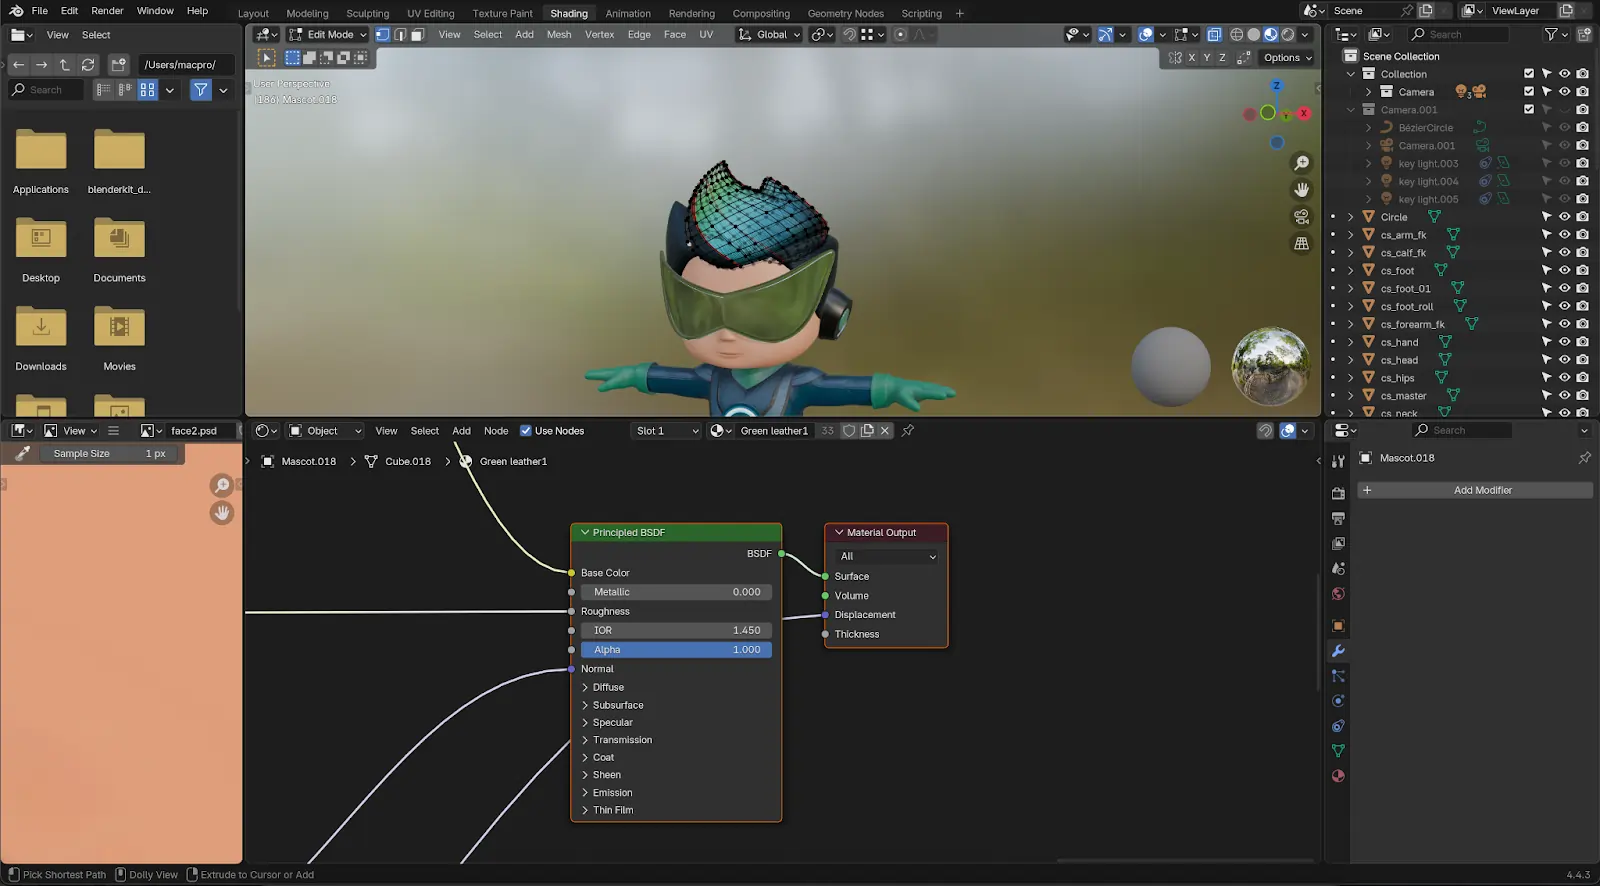
Shader nodes: Utilize the Principled BSDF shader within Blender to achieve realistic surface characteristics.
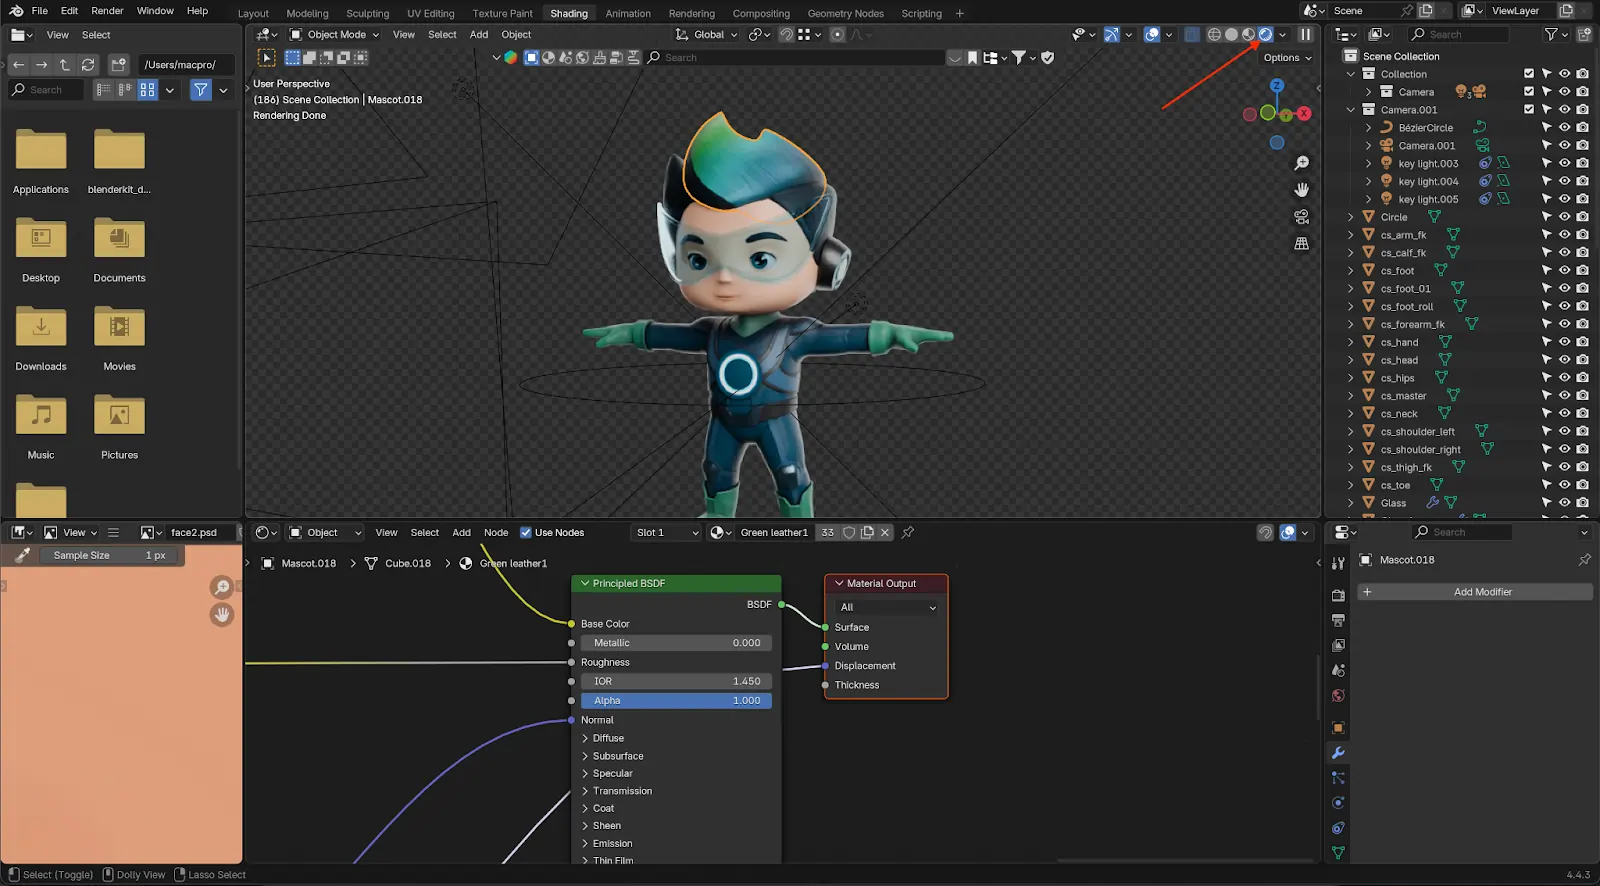
Preview settings: Preview in LookDev mode to observe material behavior in real-time under lighting.
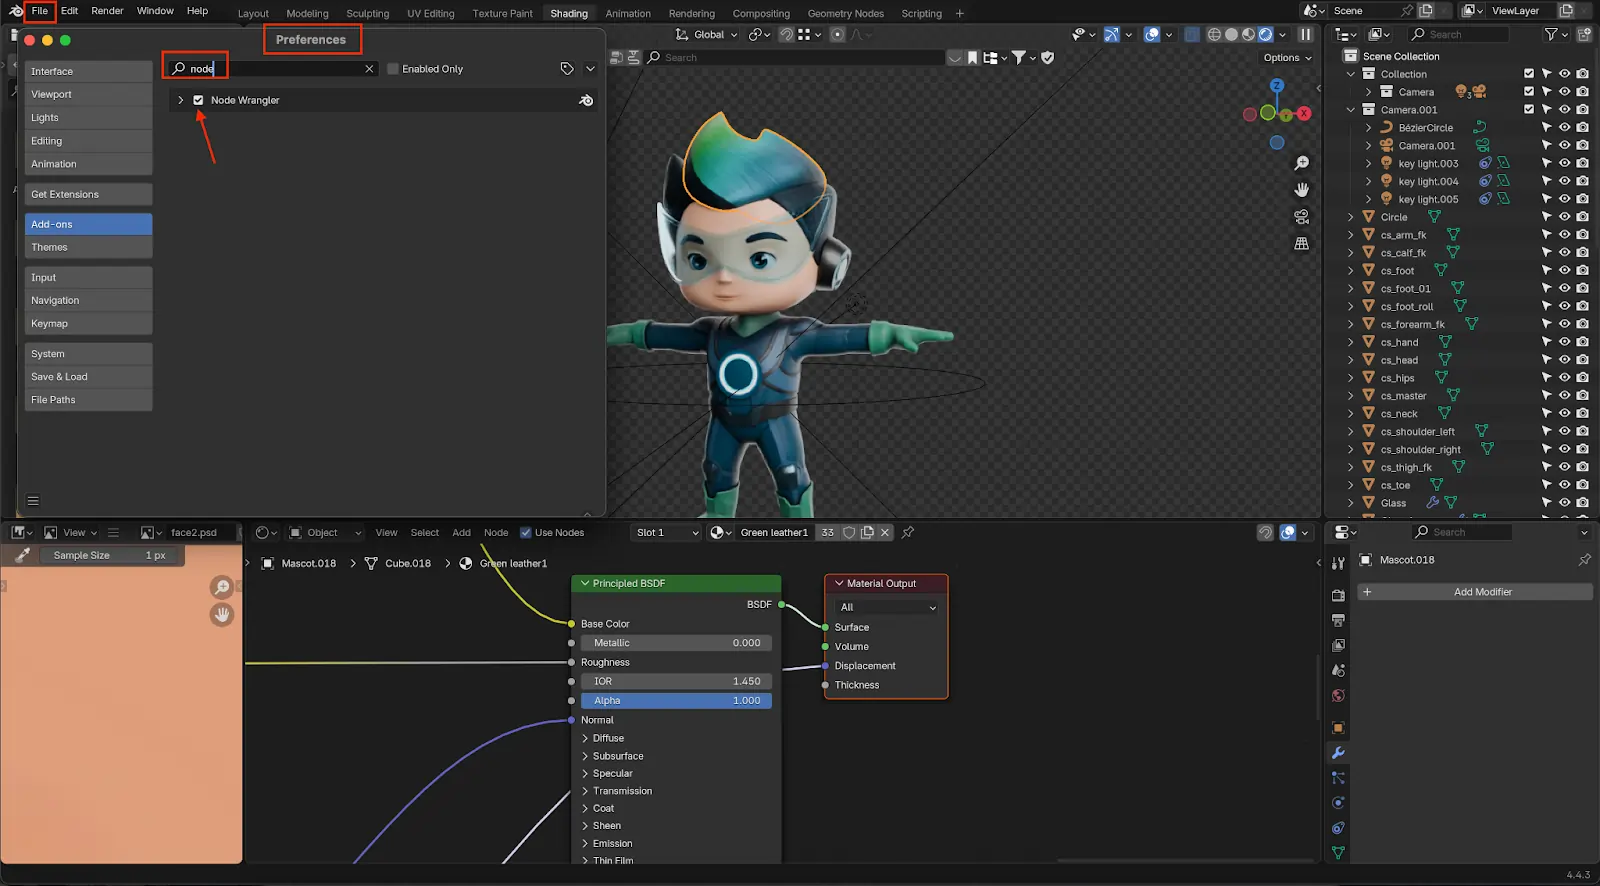
Advanced: Connect multiple textures with Blender’s Node Wrangler plugin to speed up setup.
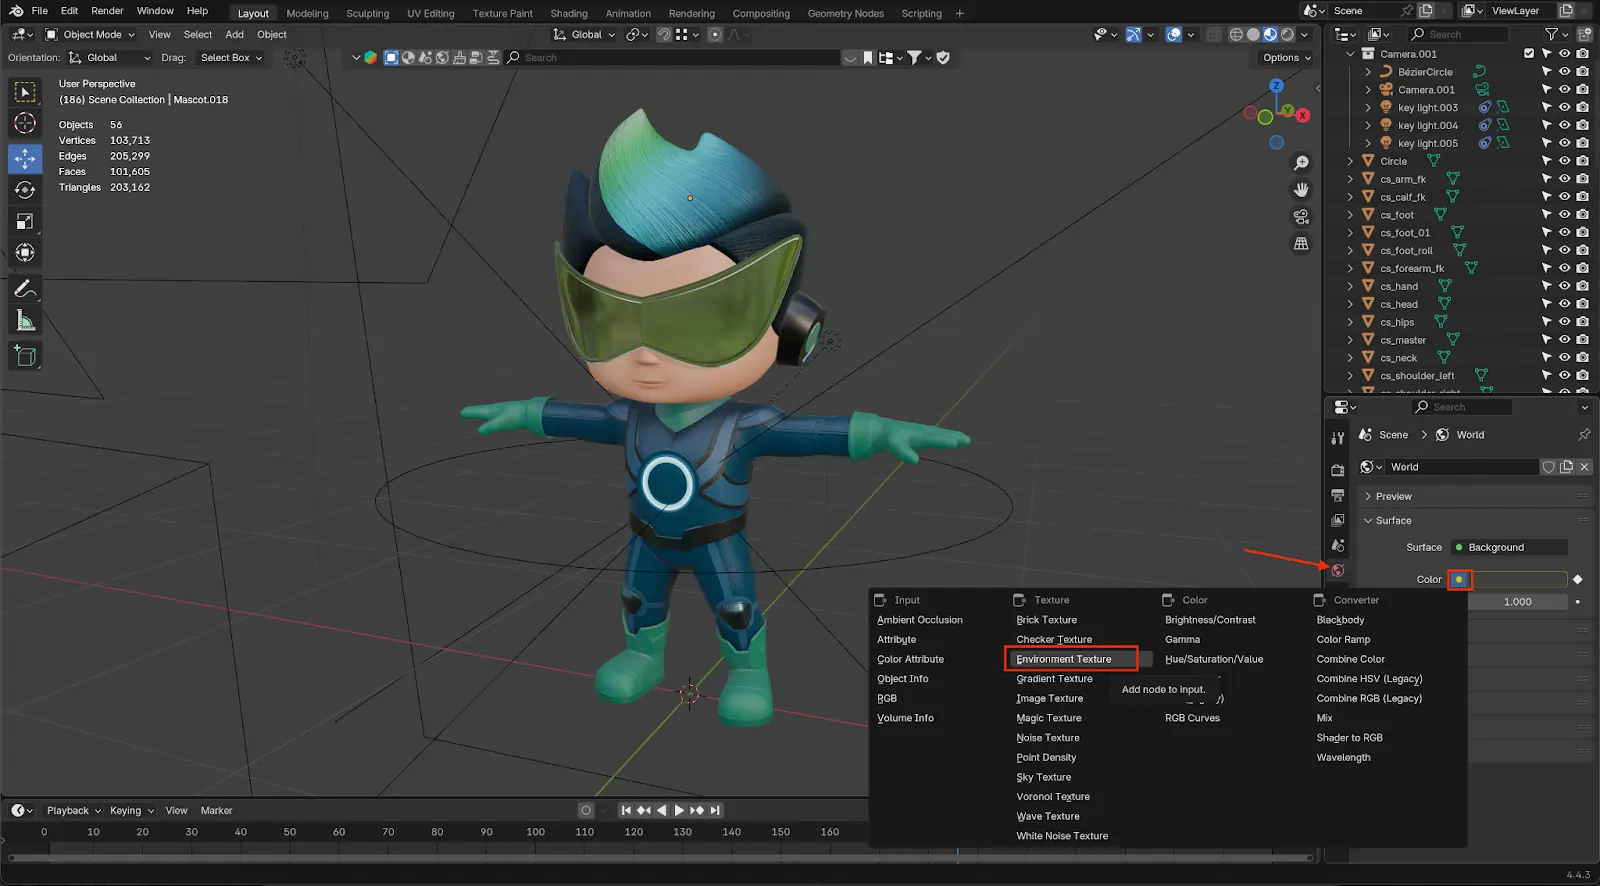
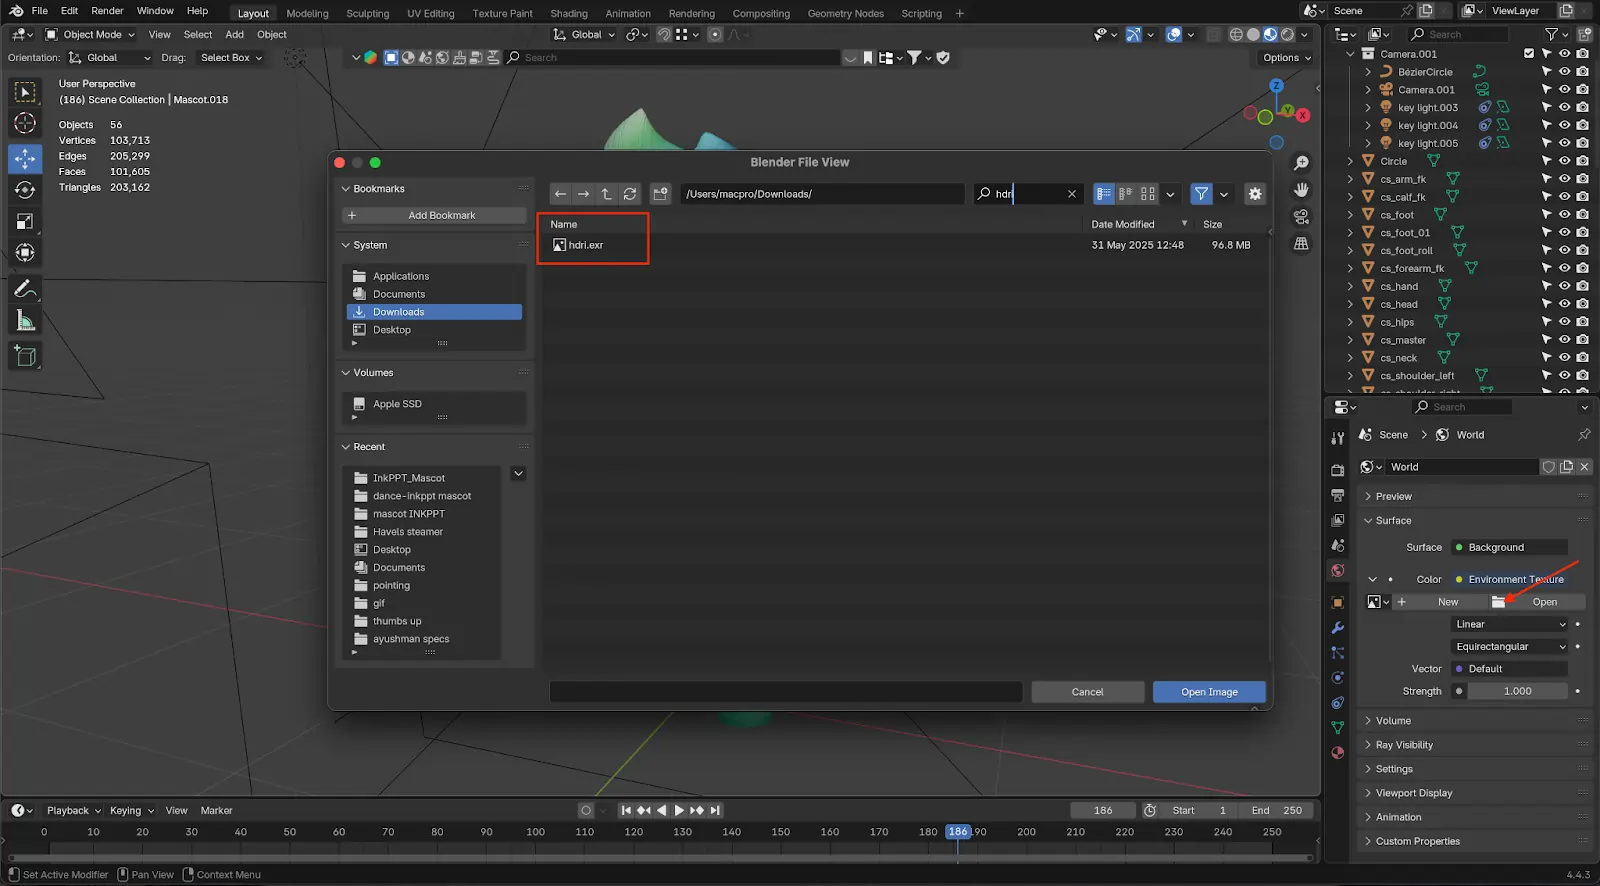
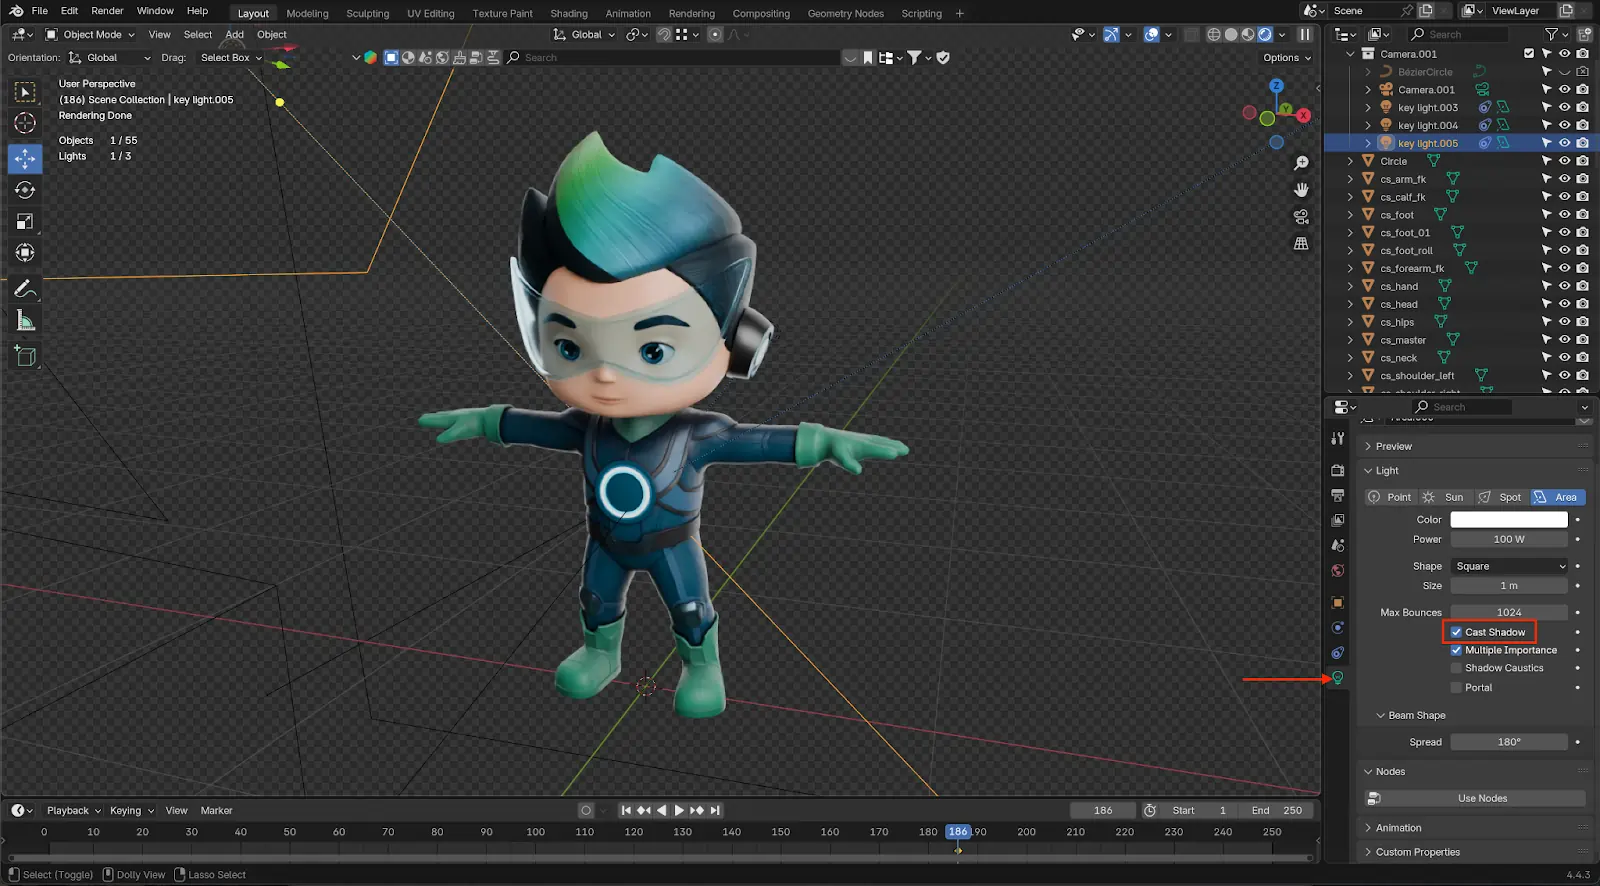
Step 3: Scene Composition and Lighting
Environmental setup: Use HDRI images (via World Shader) for natural lighting and reflection.
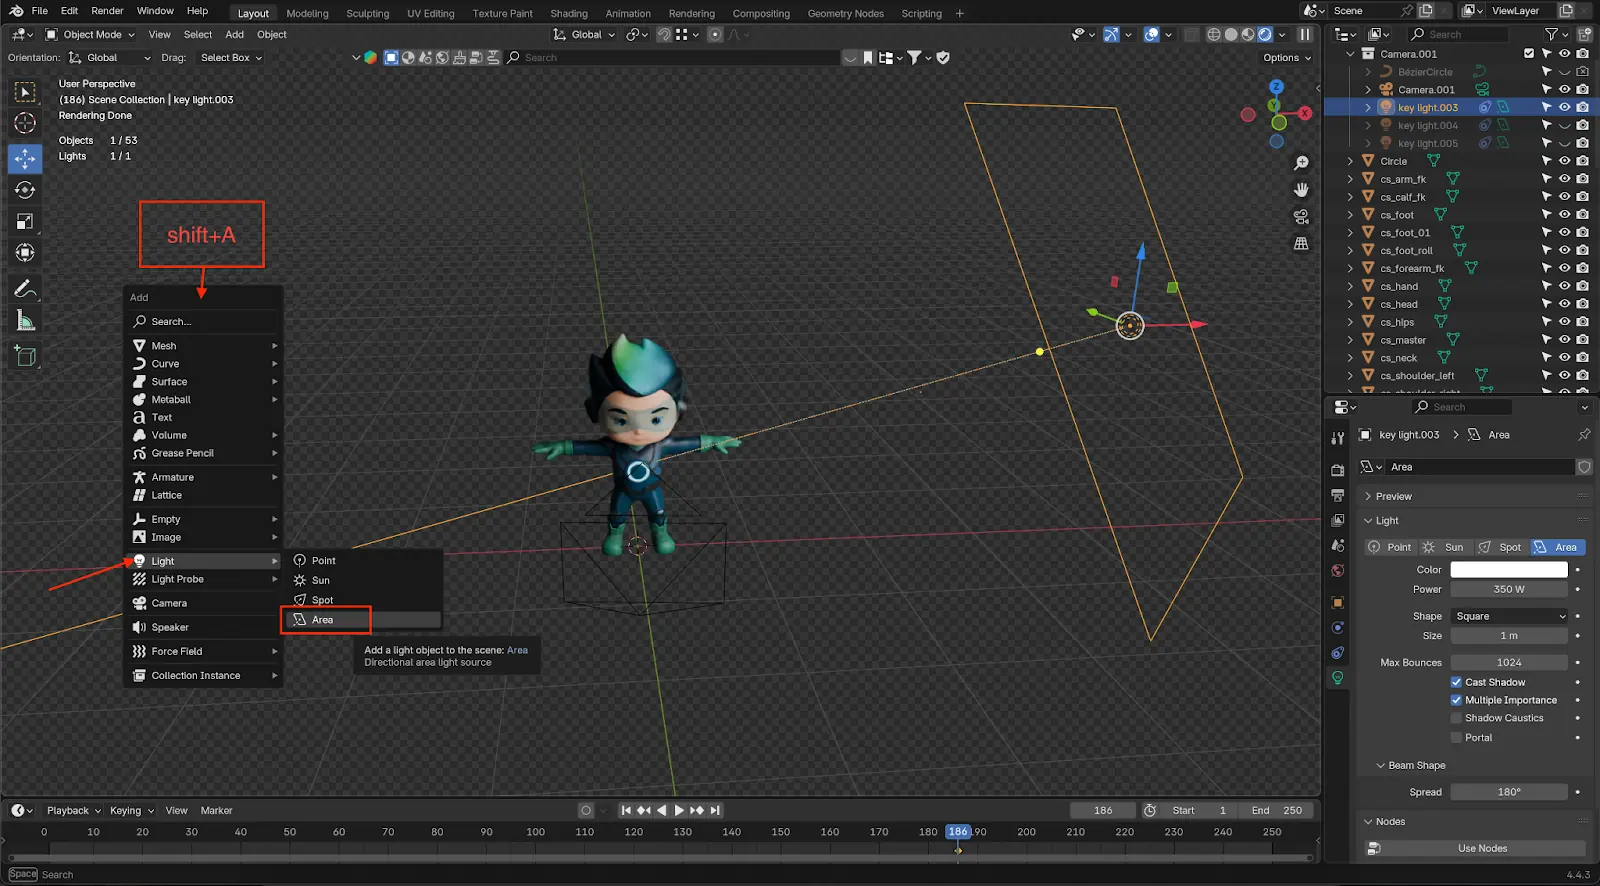
Key light arrangement: Utilize area lights to light products in focus.
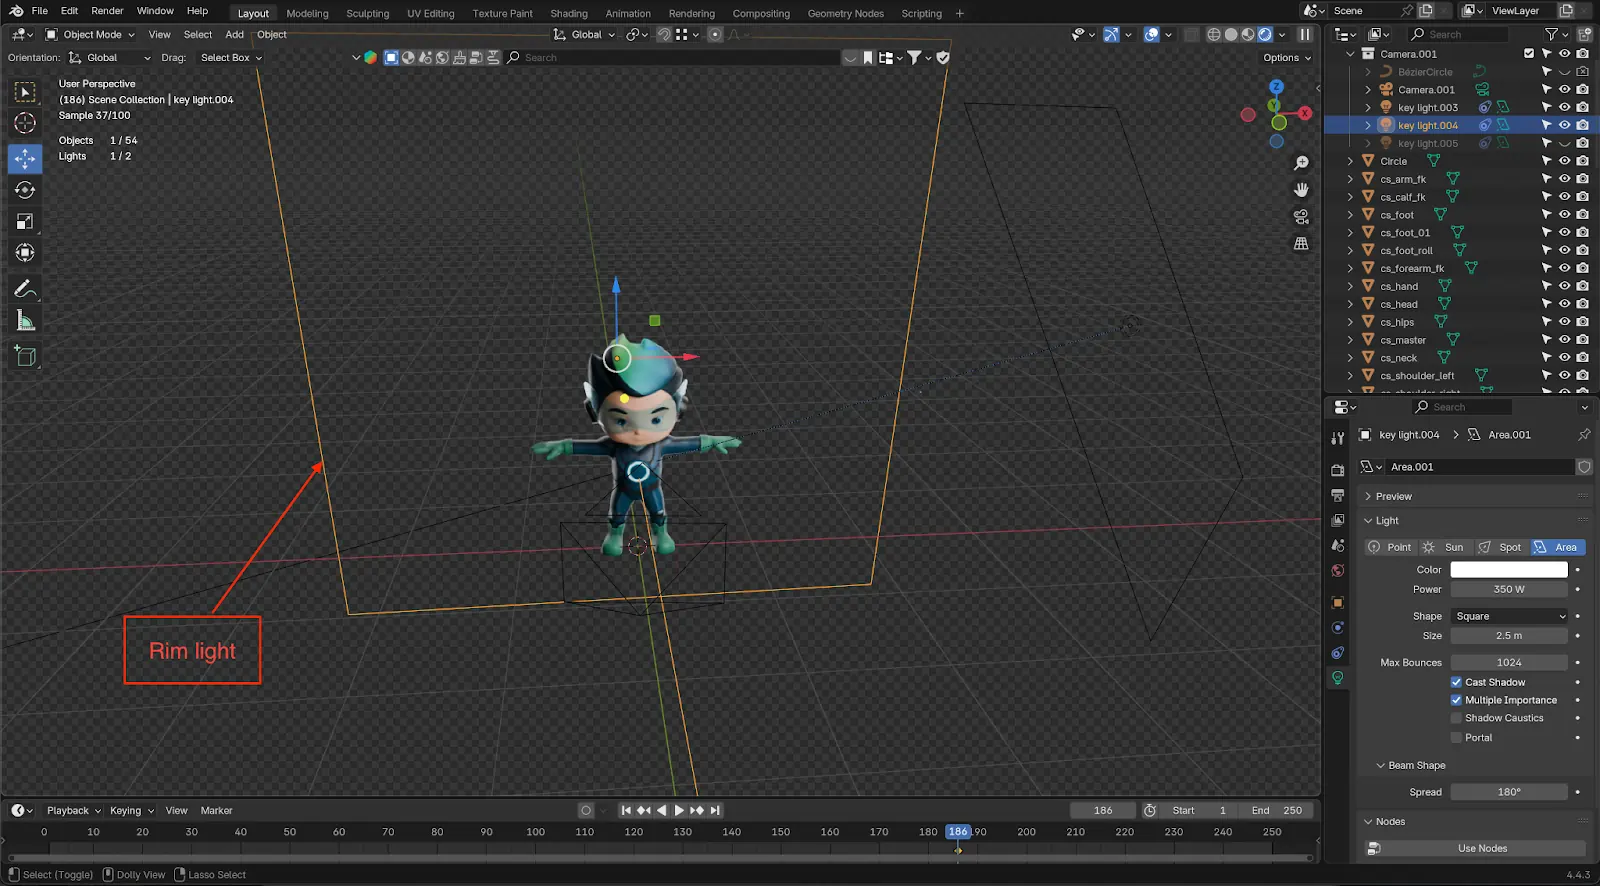
Rim light: Introduce separation from background with a thin light located behind the subject.
Shadow realism: Use soft shadows with high-resolution settings to achieve smoother falloff.
Try enabling Contact Shadows under Render Properties → Shadows to help with lighting and for added realism.
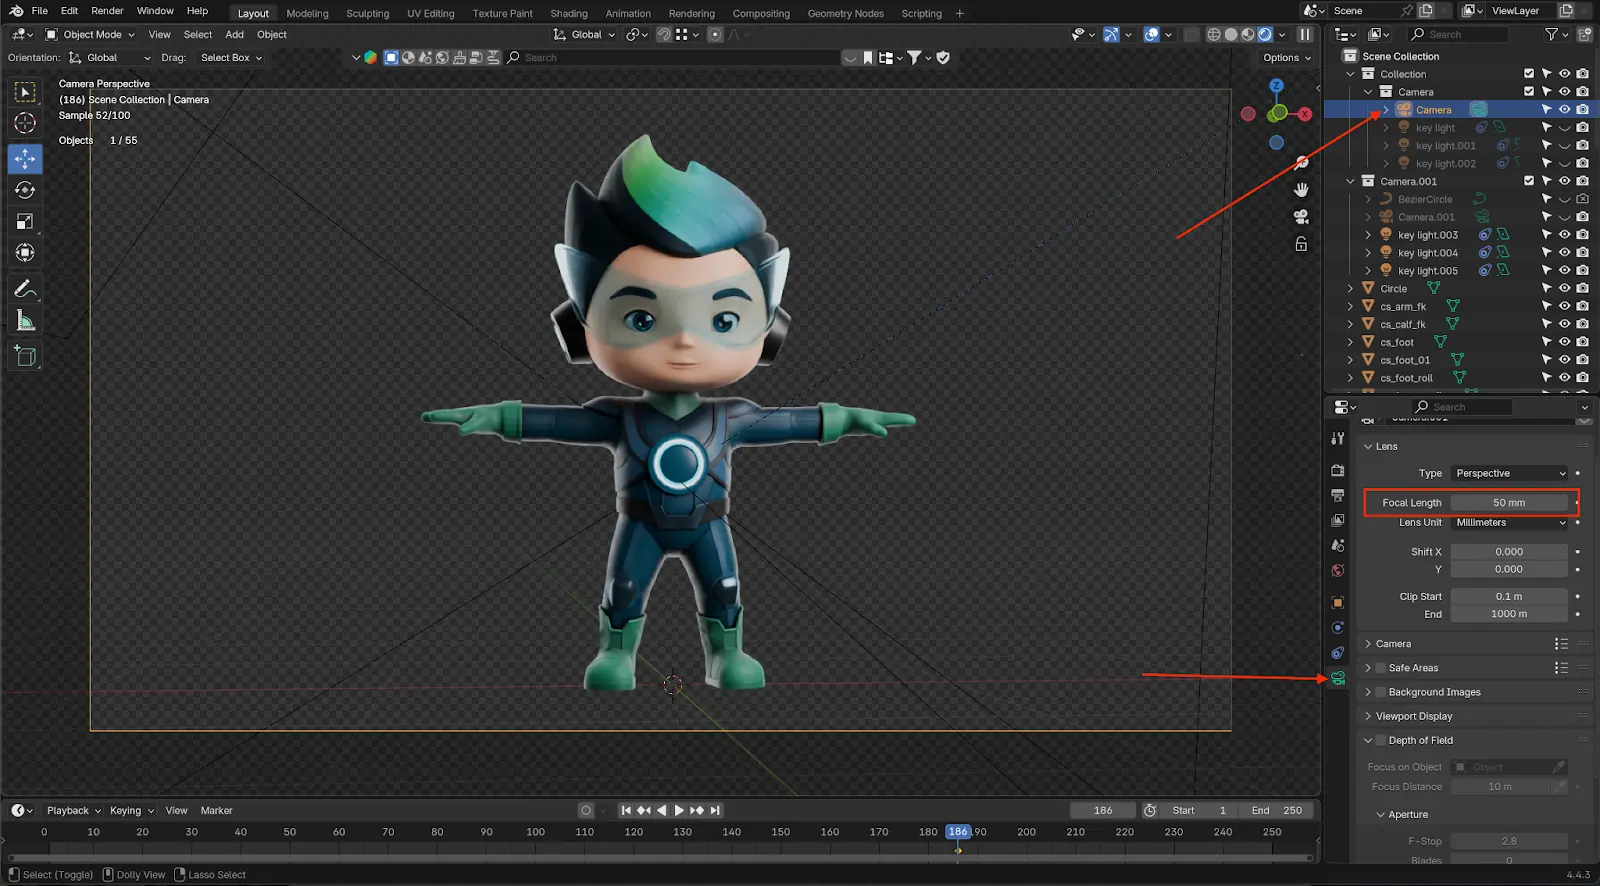
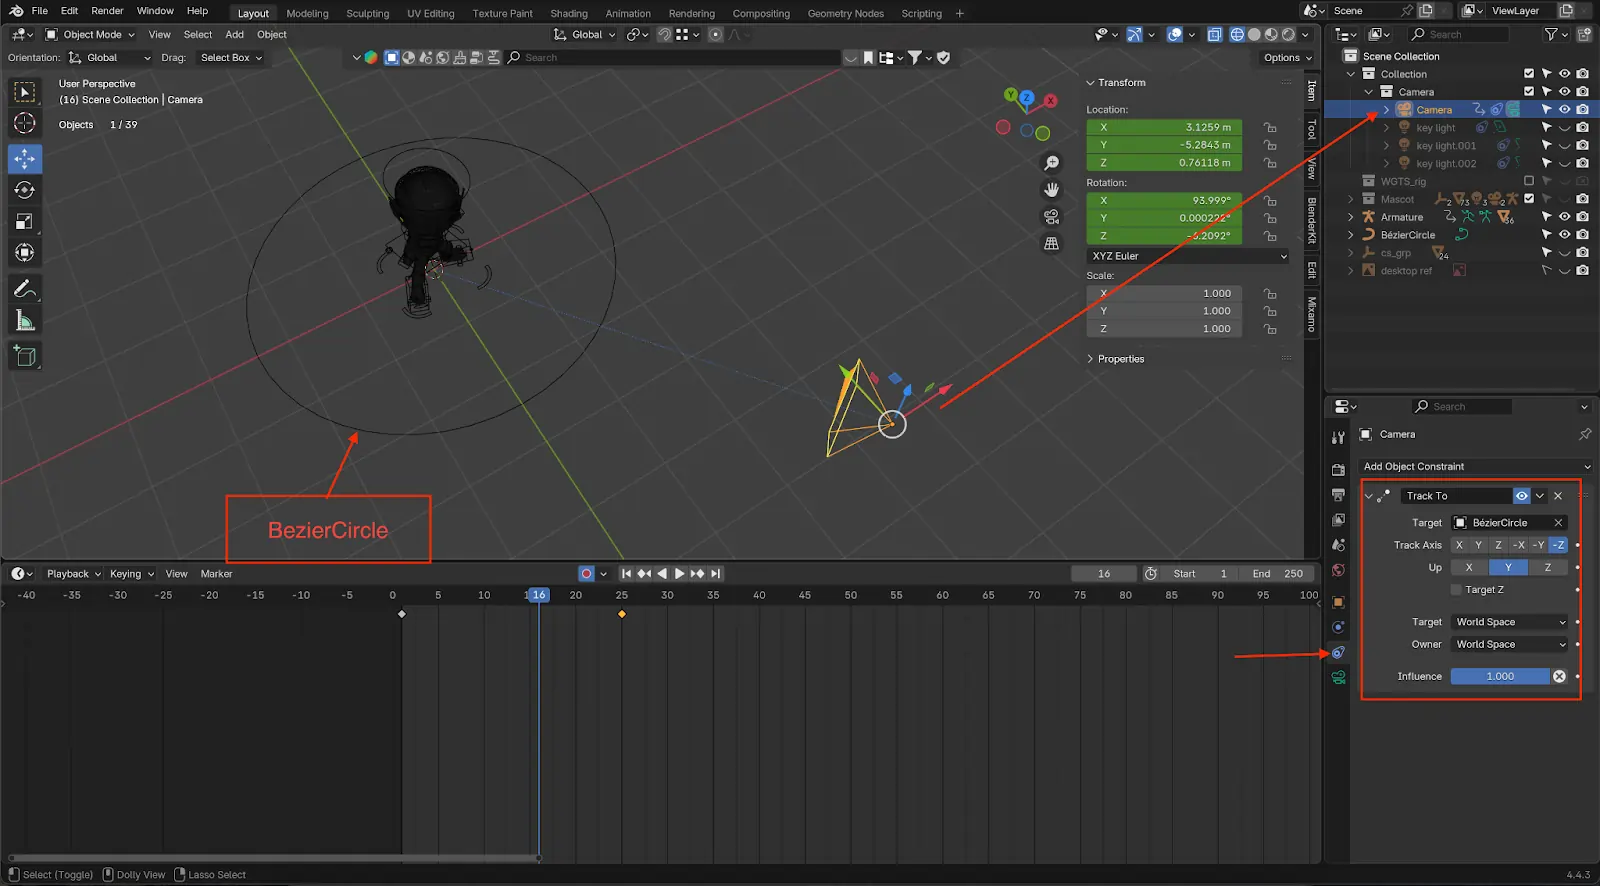
Step 4: Setting up Cameras and Animations
Camera placement: Use a 35–50mm lens to approximate in-situ product photography.
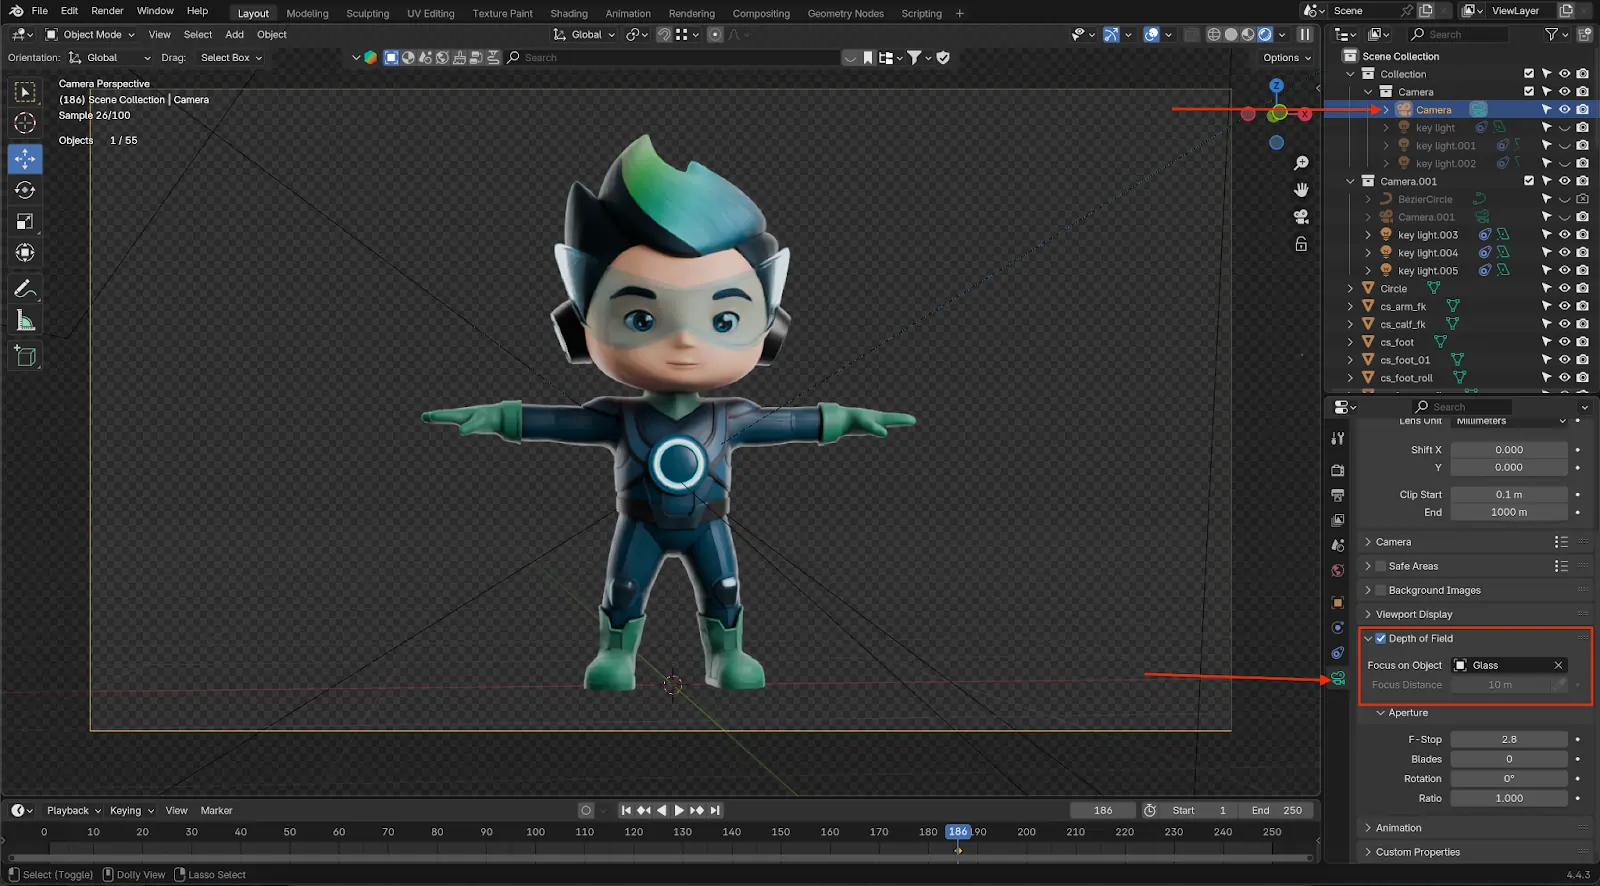
Depth of field: Enable movie-like focus transitions with DoF.
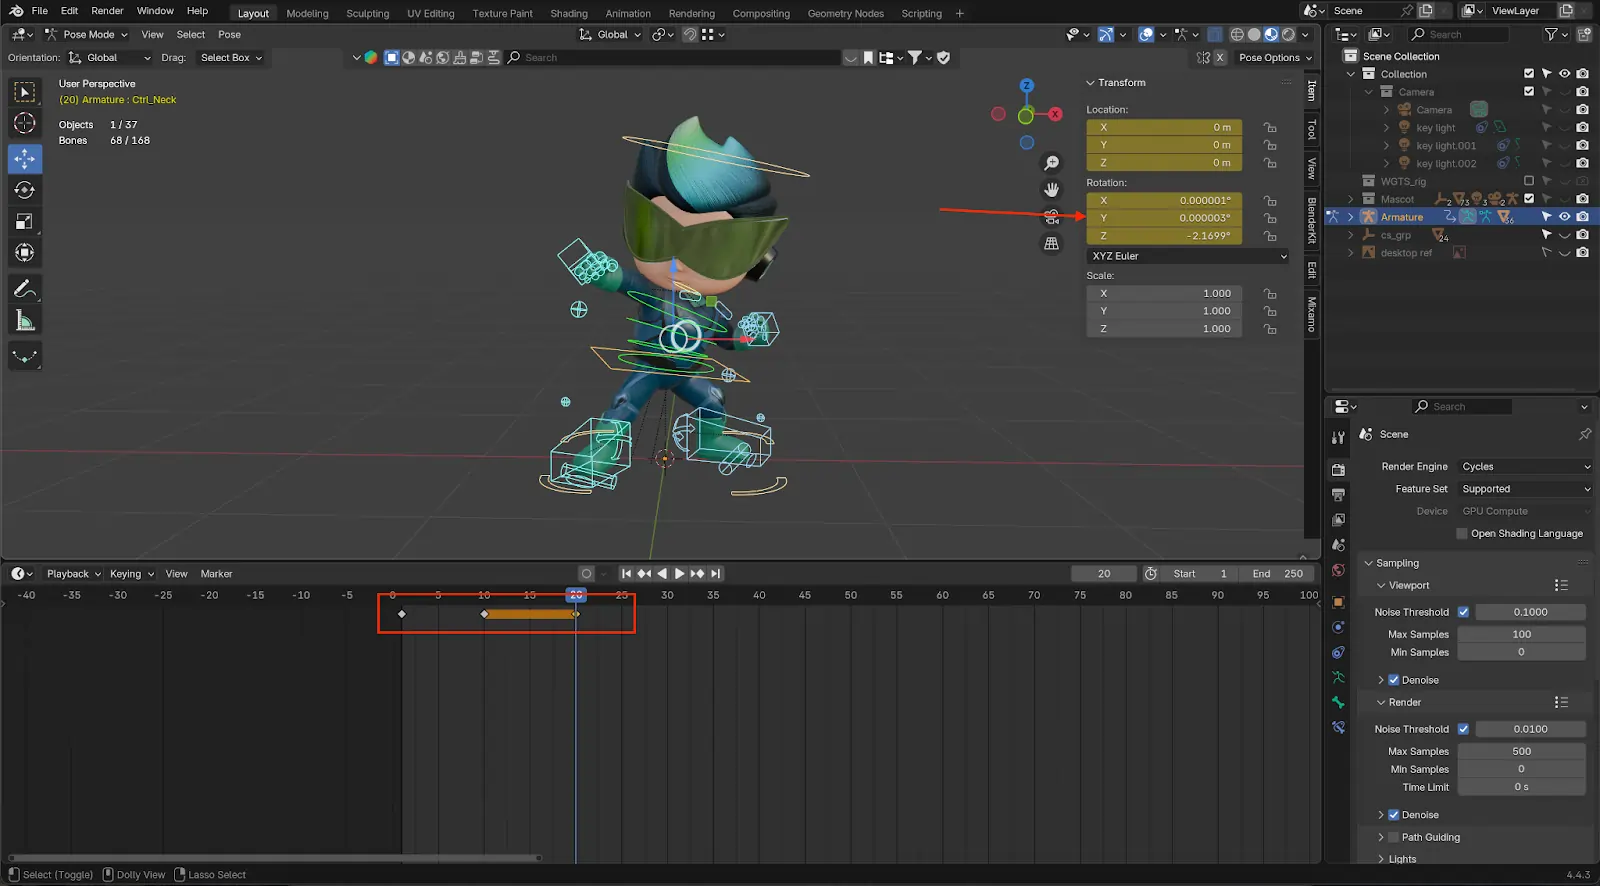
Object animation: Position/rotation keyframing of your product within 90–120 frames to create a rotation/reveal animation.
Camera movements: Use bezier curves and Track To constraints to create smooth tracking shots.
Blender Graph Editor helps to refine motion curves to create smoother motion.
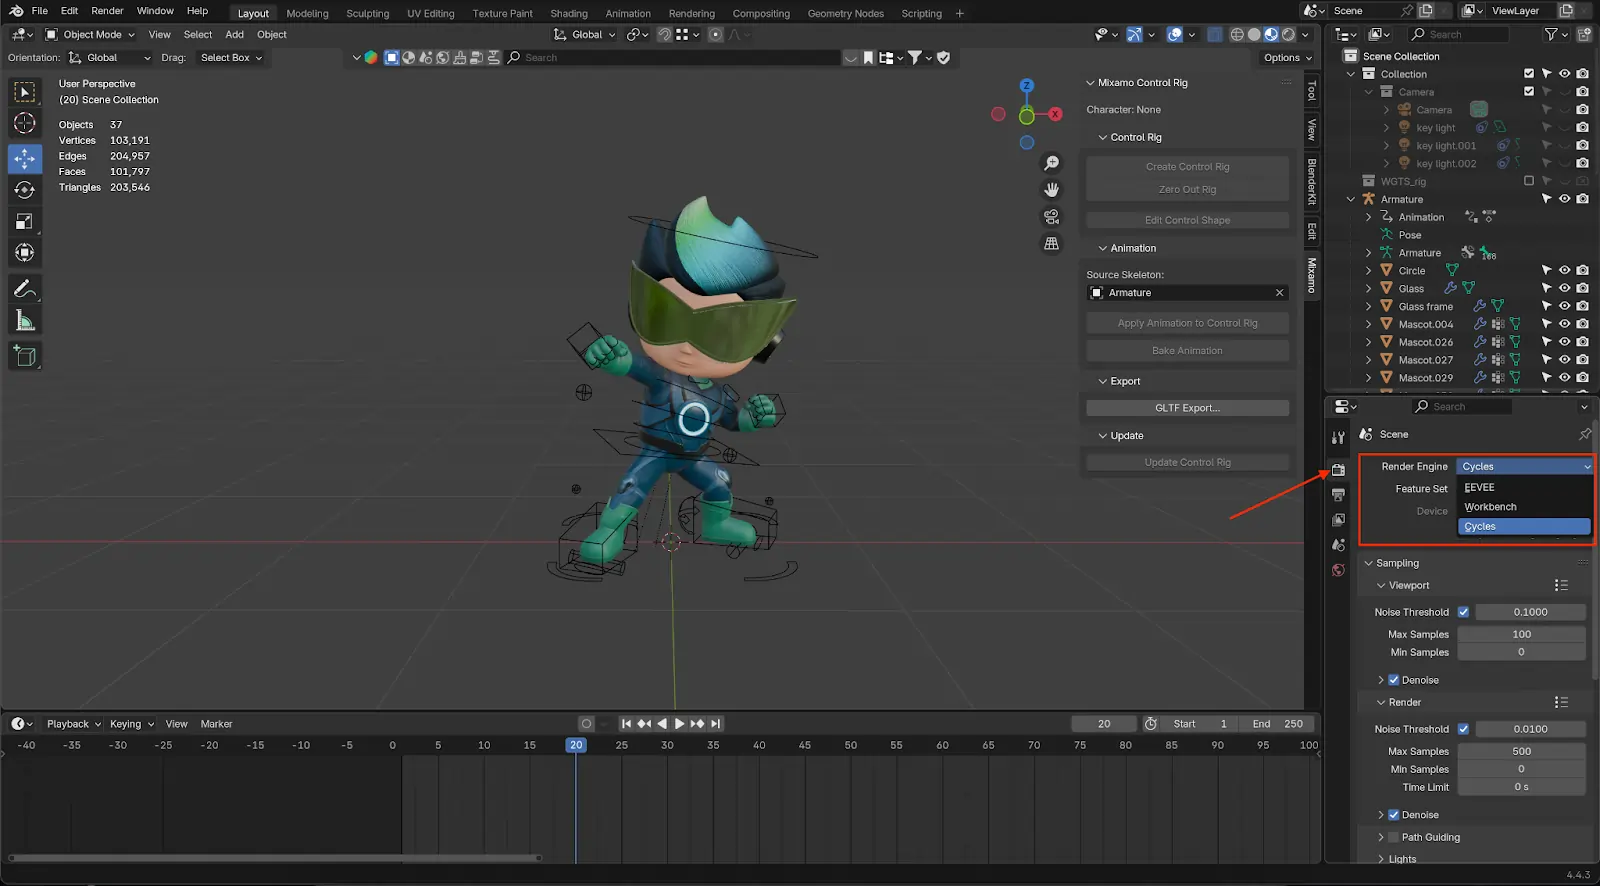
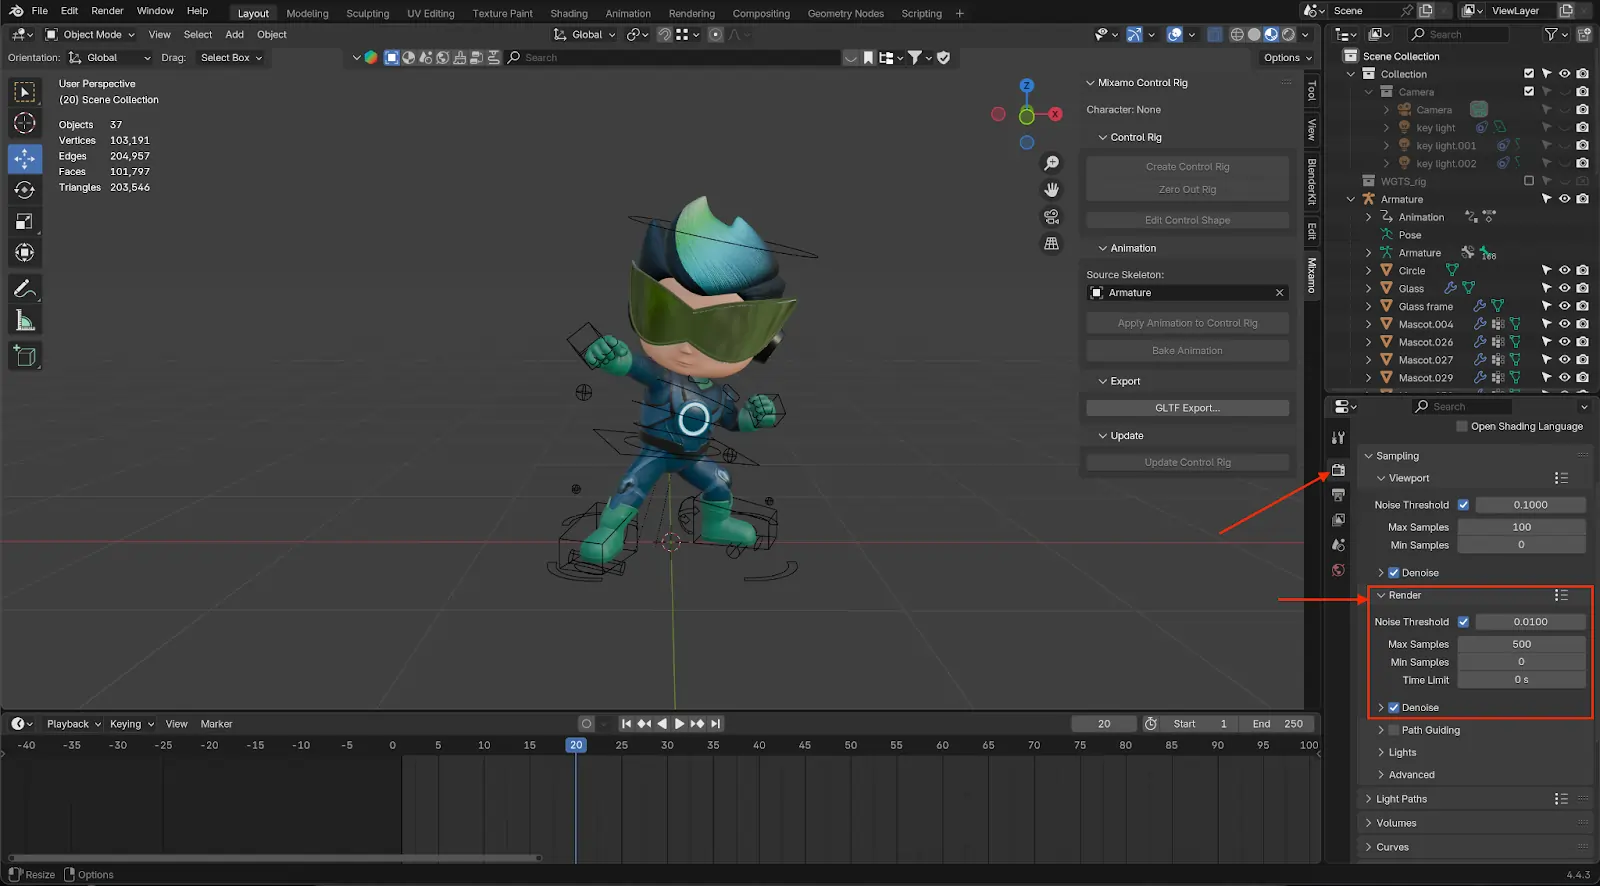
Step 5: Render Settings in Blender
Render engine: Cycles for photorealistic rendering or Eevee for live previewing.
Sampling: Use 1024–2048 samples with Denoising enabled in final production.
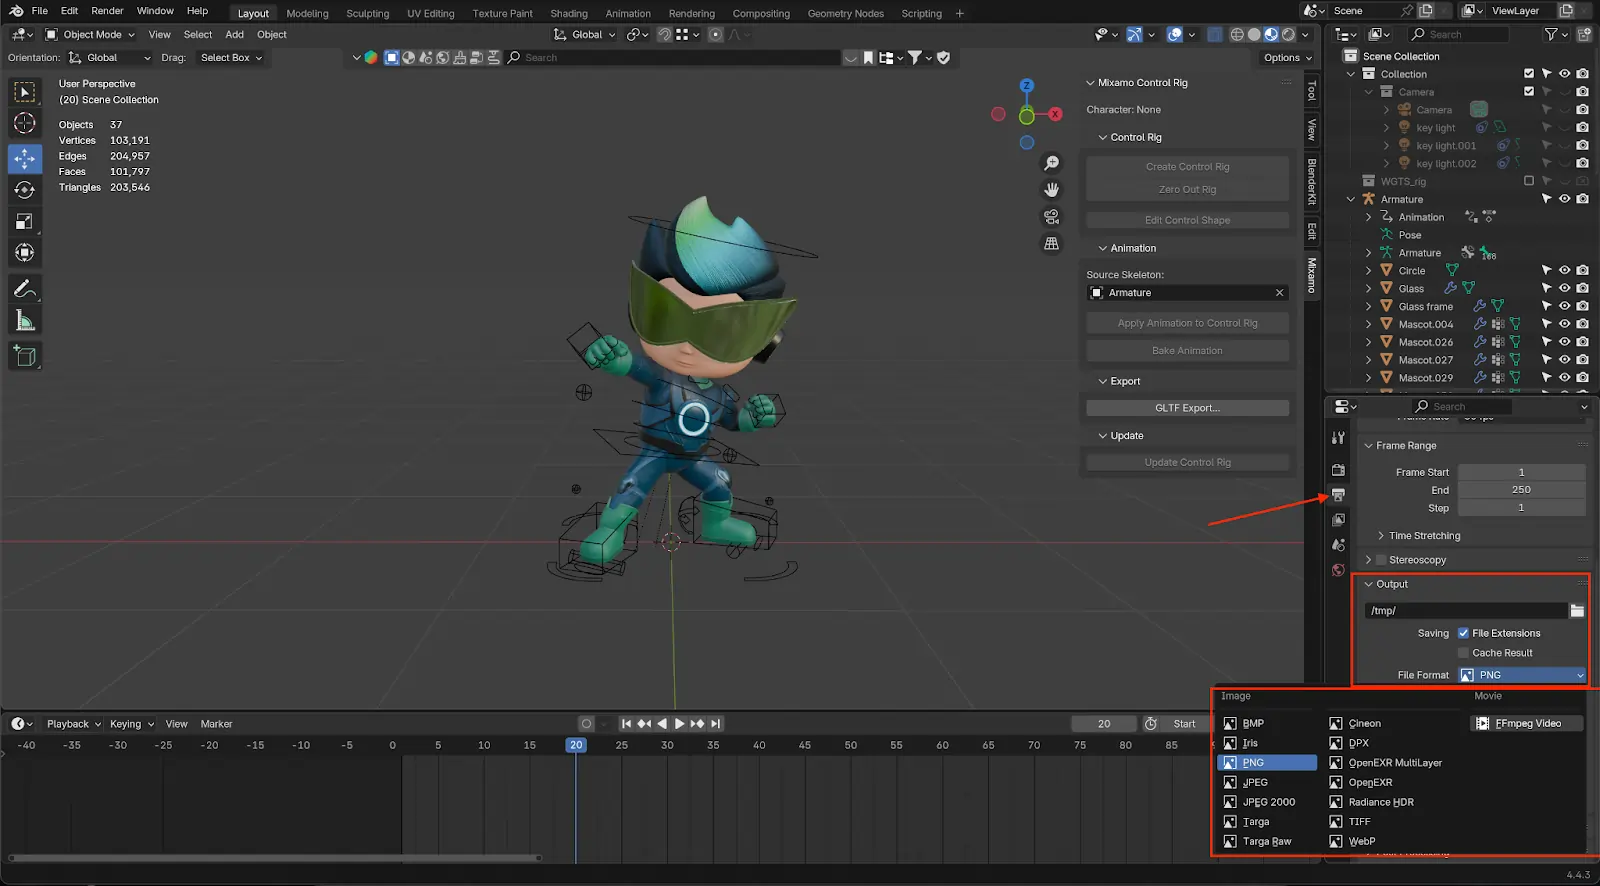
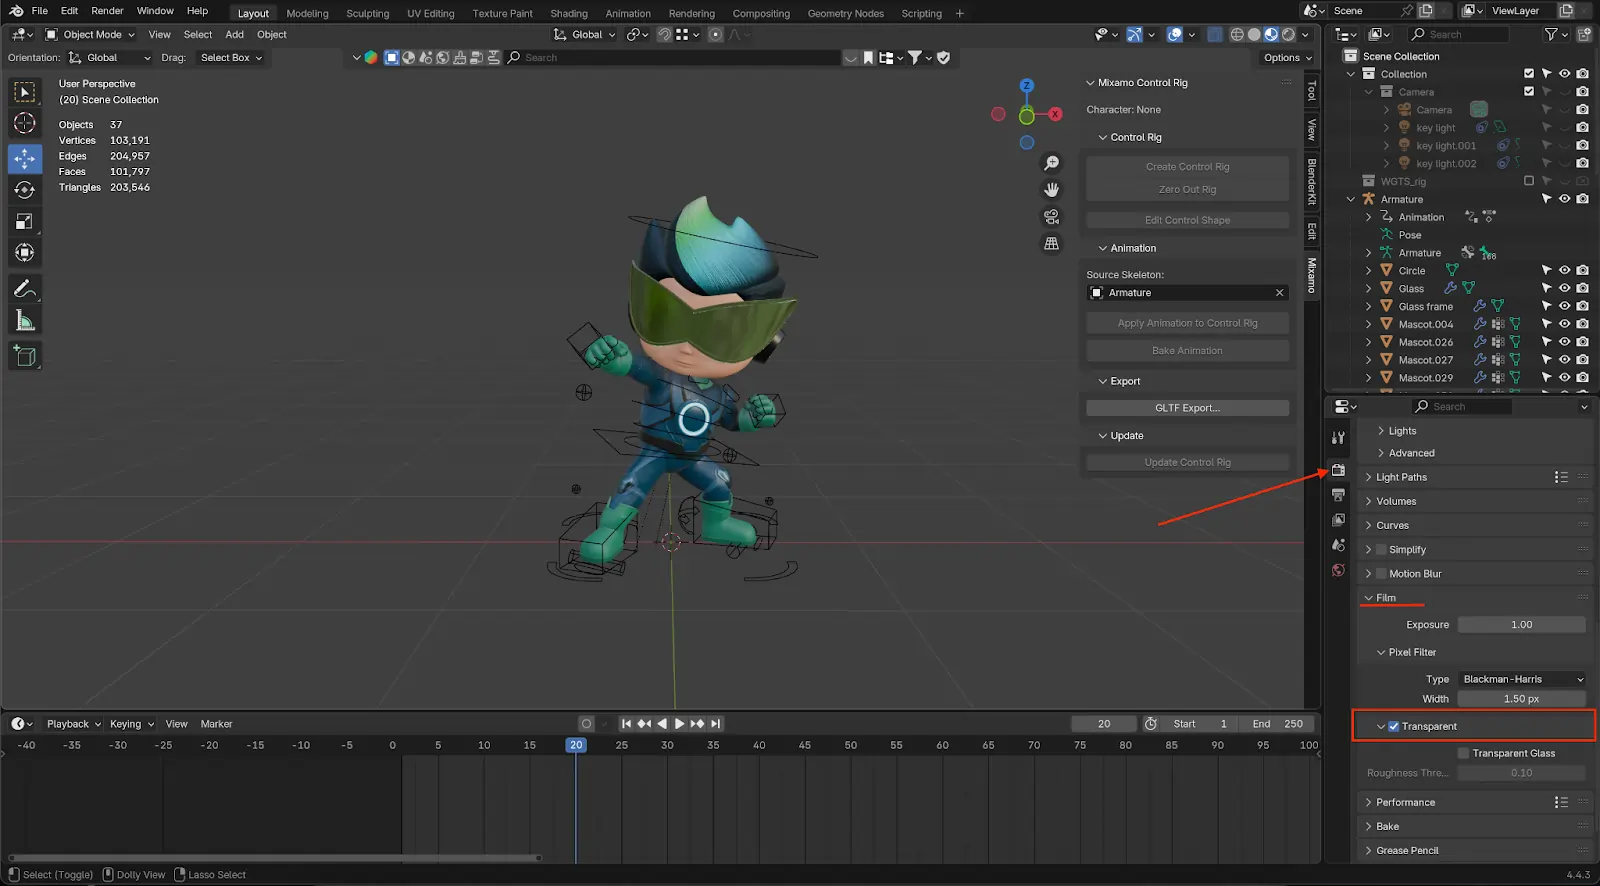
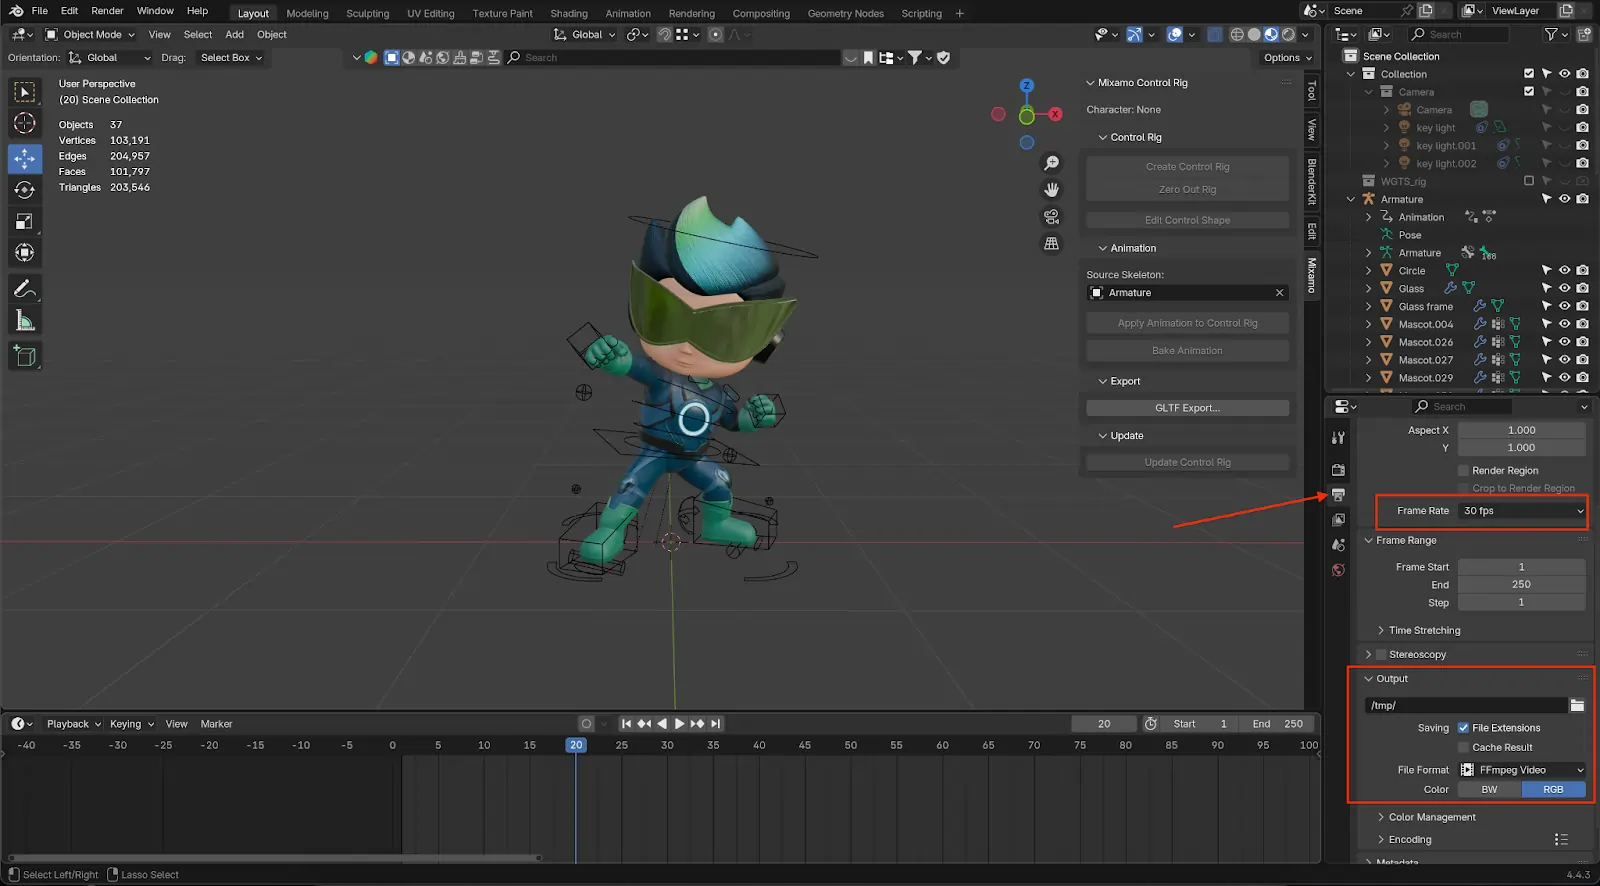
Output: Export static images in PNG format with transparent background and animations in MP4 with H.264 encoding.
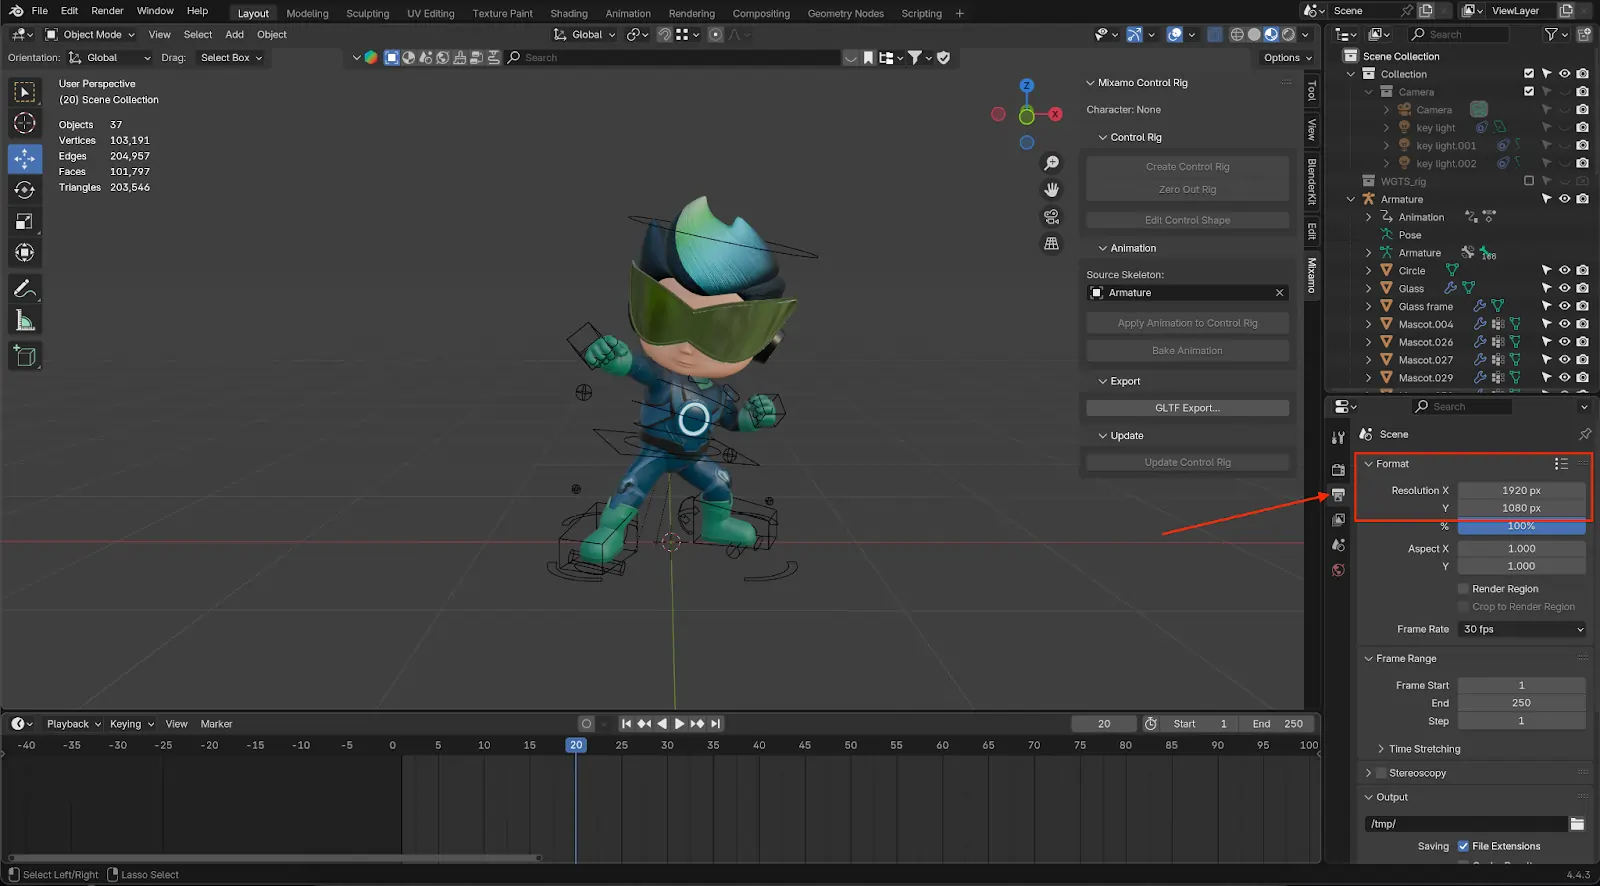
Resolution: at least 1920x1080; up to 4K for high-definition displays.
Step 6: Export and Format for PowerPoint
For Static Renders: Export to .PNG with transparency in order to overlay in slides.
Maintain aspect ratio; scale to fit slide size to balance.
For Animated Renders: Export at 24 or 30 fps in .MP4 format.
Maintain file size under 50MB to ensure smooth embedding.
Trim beginning/end if necessary with video editors (Premiere, Handbrake).
Step 7: Add 3D Render to PowerPoint
Add Static Render: Insert → Pictures → This Device Center Align, “No Background”, and soft shadows or reflections if you like.
Slide Transitions: Use Morph to switch between different states or perspectives of the product. PRO TIP: Match the color palette of your slide with the product material colors to create visual consistency.
Tools Required for This Workflow
Tool
Purpose
Cost
Blender
3D modeling, rendering, and animations
Free
AmbientCG / Poly Haven
High-quality PBR texture libraries
Free
HandBrake
MP4 video compression and optimization
Free
PowerPoint (Office 365+)
Final presentation delivery tool
Paid
Why Blender? Why Not Some Other 3D Rendering Software?
Out of all renders software, Blender suits the needs of INK PPT due to the following reasons:
Advanced realtime rendering (EEVEE)
Full physics simulation and animation pipeline
Open-source adaptability
Shader node control to achieve material realism
Though other 3d rendering software such as KeyShot or Maya are capable, the open-source solution that stands out the most for 3d product rendering services' needs—particularly when dealing with PowerPoint, is Blender.
INK PPT: Making 3D Product Renderings Presentable
We produce precise, cinematic, and clear 3D animations with Blender. From auto products to consumer products, we develop 3D modeling, texture, lighting, and animate 3D animations for international auto, FMCG, and tech companies. But that's not all, we ensure that the output displays flawless within your presentation deck. No unwanted embeds, no wrong-resolution-matched ones either. Just stunning visual storytelling in a single seamless workflow.
Optimized, lightweight 3D models for Unity, WebAR, and beyond
Clickable, interactive, and platform-ready
We don't make content, we craft experiences that stir people.
Watch Our 3D Showreel in Action
Let’s turn your products into unforgettable visual experiences, engineered for impact.
Final Thoughts
Making excellent-looking visuals is no more just about style because it’s all about making photorealistic images that represent a product story with accuracy and detail. From lighting impressions and texture mapping to seamless collaboration within different settings, today’s brands need 3D product visuals that are capable of capturing customers in all aspects of ecommerce sites, promotional material, products within a web environment, and even within virtual reality experiences.
INK PPT merges 3D animation, render precision, and marketing strategy to produce realistic images that impact. From product renderings for webstores to effective campaign pieces, every image is optimized for realism, speed, and consistency of brand.
Discover how photorealistic images can transform your product design and marketing.
Why is 3D product rendering better than static images in presentations?
3D product rendering creates photorealistic visuals using advanced rendering software that simulates lighting, texture, and material properties with high precision. Unlike static images or simple photographs, 3D renderings offer customization, realism, and flexibility. They enhance clarity in marketing assets, elevate e-commerce visuals, and improve the overall online buying experience. The result? A more premium-looking image that drives deeper engagement and strengthens visual storytelling in your presentations.
Can custom 3D animation be used within a PowerPoint presentation?
Absolutely. Tools like Blender allow you to produce in-house 3D animations rendered in MP4 format, perfect for showcasing product features, dynamic camera movement, and smooth transitions. These animations can be embedded directly into PowerPoint, enriched with visual effects and technical flair. Ideal for e-commerce and technical presentations alike, this approach adds motion, depth, and realism to product showcases—highlighting everything from material finishes to specific angles with precision.
What rendering software should I use to create realistic images for PowerPoint?
Blender is a powerful, open-source rendering program perfect for creating photorealistic visuals and animations. It supports high-resolution outputs, PBR (physically based rendering) textures, technical illustrations, and seamless export for presentations. Blender’s robust capabilities—combined with zero licensing costs—make it a go-to choice for designers aiming to deliver high-impact 3D visuals without compromising on quality or budget.
What are common mistakes to avoid in 3D rendering?
Avoid skipping UV unwrapping or using low-resolution textures, as these greatly impact image clarity. Don’t overload your PowerPoint with uncompressed video files—they can slow performance and distort playback. Poor lighting setups and mismatched backgrounds also reduce visual effectiveness. To maintain quality, partner with experienced 3D rendering professionals who prioritize resolution, realism, and technical accuracy in every frame.
What aspects can I control during the 3D rendering process?
With tools like Blender, you can control a wide range of elements—surface finishes, lighting conditions, focus depth, and texture mapping. You can also simulate different environments, animate object movement, or add interactive elements to bring your product to life. Whether you're preparing visuals for a presentation, e-commerce gallery, or promotional video, 3D rendering gives you the flexibility to shape every detail to fit your vision.
Is 3D rendering suitable for technical drawings and promotional materials?
Definitely. 3D rendering bridges the gap between design precision and marketing appeal. It allows you to transform engineering-grade details into visually compelling, high-resolution images that are presentation-ready. Whether you're showcasing CAD models, complex assemblies, or promotional visuals, 3D rendering is ideal for creating assets that are both technically accurate and consumer-facing—especially in industries like e-commerce, AR/VR, or product visualization.
I'm Satnam Singh, a dedicated 3D artist turning ideas into vivid realities. With expertise in modeling, sculpting, and rendering, I design captivating worlds and characters. From game assets to animations, I fuse creativity with precision—constantly evolving to push the boundaries of visual storytelling.


.webp)